Tag Archives: Ina Garten

Beef Bourguignon

If Julia Child had tried this recipe, she would have thrown her 5-hour, Level Advanced boeuf bourguignon straight out the window. I can’t tell you the number of expletives that slipped through my lips as I bit into my first piece of tender, juicy meat, or licked the remains of a sauce rich with bits of bacon, wild mushrooms, black pepper and good red wine. I literally ran my finger over the plate to get every last bit.

This miraculously chic dish came from the cast-aways of my beef tenderloin extravaganza. That’s right – the more fatty, tissuey ends of the massive beef tenderloin. I sliced them thick and prepared them as Ina Garten would use a filet of beef mignon. The result was culinary magic.

I made a few changes to the recipe – for instance, using frozen pearl onions (who has that kind of time?) and reducing the amount of bacon (I didn’t have enough on hand).

I know that I said beef tenderloin should be a once-a-year kind of thing. But whoa, friends, am I rethinking my resolution.

Updated Beef Bourguignon

Ingredients:

  • 1 (3-pound) filet of beef, trimmed, or 3 pounds of beef tenderloin
  • Kosher salt and freshly ground black pepper, for seasoning plus 1 teaspoon salt and 1/2 teaspoon pepper
  • 3 to 4 tablespoons good olive oil
  • 1/4 pound bacon, diced
  • 2 garlic cloves, minced
  • 1 1/2 cups good dry red wine, such as Burgundy or Chianti
  • 2 cups beef stock
  • 1 tablespoon tomato paste
  • 1 sprig fresh thyme
  • 1/2 pound frozen pearl onions
  • 8 to 10 carrots, cut diagonally into 1-inch-thick slices
  • 3 tablespoons unsalted butter at room temperature
  • 2 tablespoons all-purpose flour
  • 1/2 pound wild mushrooms (I used cremini), sliced 1/4-inch thick

With a sharp knife, cut the beef crosswise into 1-inch-thick slices. Salt and pepper the filets on both sides. In a large, heavy-bottomed pot (I used my Dutch oven) on medium-high heat, sear the slices of beef in batches with 2 to 3 tablespoons oil until browned on the outside and very rare inside, about 2 to 3 minutes on each side. Remove the fillets from the pan and set aside.

In the same pot, saute the bacon on medium-low heat for 5 minutes, until browned and crisp. Remove the bacon and set it aside. Drain all the fat, except 2 tablespoons, from the pot (or leave it…meh). Add the garlic and cook for 30 seconds.

Deglaze the pot with the red wine and cook on high heat for 1 minute, scraping the bottom. Add the beef stock, tomato paste, thyme, 1 teaspoon salt, and 1/2 teaspoon pepper. Bring to a boil and cook uncovered on medium-high heat for 10 minutes. Strain the sauce and return it to the pot. Add the frozen onions and carrots and simmer uncovered for 20 to 30 minutes, until the sauce is reduced and the vegetables are cooked.

With a fork, mash 2 tablespoons butter and the flour into a paste and whisk it gently into the sauce. Simmer for 2 minutes to thicken.

Meanwhile, saute the mushrooms separately in 1 tablespoon butter and 1 tablespoon oil for about 10 minutes, until browned and tender.

Add the beef slices, the mushrooms, and the bacon to the pan with the vegetables and sauce. Cover and reheat gently for 5 to 10 minutes. Do not overcook. Season, to taste, and serve immediately with crusty bread to mop up the sauce.

Le sigh. I don’t have any other good pictures, but let your minds wander…

I’ve already waxed on about how yummy this dish is. And it was kind of fun to make on a day when you have some time to devote to your kitchen creations.

Enjoy, friends!

Homemade Ricotta with Herbs

I made my own ricotta! Another item added to my “I never thought I’d make my own…” list. I don’t know if Ina Garten just used a shortcut, or if this is legit. But it is legitimately delicious.

All you do is boil a little milk with cream, a dash of salt, then stir in some white wine vinegar to curdle it all. Then you strain into cheesecloth and voila! Mix with your favorite herbs and swirl into pasta or plop on a piece of toast, just as I have.

Adapted from Ina Garten.

Homemade Ricotta with Herbs

Ingredients:

  • 4 c. whole milk (one medium carton)
  • 2 c. heavy cream (one small carton)
  • 1 tsp kosher salt
  • 3 T white wine vinegar
  • 3 tablespoons minced scallions, white and green parts (2 scallions)
  • 3 T chopped fresh basil

Set a large sieve over a deep bowl. Dampen 2 layers of cheesecloth with water and line the sieve with the cheesecloth.

Pour the milk and cream into a stainless-steel or enameled pot. Stir in the salt. Bring to a full boil over medium heat, stirring occasionally. Turn off the heat and stir in the vinegar. Allow the mixture to stand for 1 minute until it curdles. It will separate into thick parts (the curds) and milky parts (the whey).

Pour the mixture into the cheesecloth-lined sieve and allow it to drain into the bowl at room temperature for 20 to 25 minutes, occasionally discarding the liquid that collects in the bowl. The longer you let the mixture drain, the thicker the ricotta. Transfer the ricotta to a bowl, discarding the cheesecloth and any remaining whey. Use immediately or cover with plastic wrap and refrigerate. The ricotta will keep refrigerated for 4 to 5 days.

To continue with the recipe…

Mix the ricotta with your herbs; set aside.

Heat broiler and drizzle sourdough bread slides with EVOO and sprinkle with S&P. Broil on both sides until lightly browned, then rub one side with a garlic clove.

To serve, dollop 1 spoonful of ricotta cream on each piece of toast. Top with a little extra S&P, if needed.

The ricotta is so smooth and creamy – way more so than store-bought. Like a cool little cloud with flecks of herbs.

I served my herbed ricotta bruschetta as an appetizer for a dinner party and people went nuts over it. I’ve been asked to bring it to another holiday gathering this weekend.

Enjoy, friends! xoxo

Gruyere Risotto Cakes

The only way risotto leftovers can be made better? Form them into patties, roll in panko bread crumbs and fry lightly in extra-virgin olive oil.

Afraid of making risotto? Try making risotto cakes! Seriously – this is like an easy introduction to the beauty of thick, creamy risotto jazzed up with any flavors you desire. And the flaky panko breadcrumbs provide such a perfect crunch.

I must say that Grant declared these to be in his “top 3” meals I’ve made. Now if only I could remember the first two…

This recipe from Ina Garten is easy to tweak. For instance, I didn’t have Greek yogurt, so I used some low-fat sour cream that I already had. I didn’t have chives, so I used green onions. Gruyere was miraculously on sale, so I used that instead of fontina. In my opinion, Gruyere is a far superior cheese (and my favorite cooking cheese) to fontina, so it was an obvious switch.

Next time, I may try to freeze the cakes before frying – some of them still tried to fall apart on me. Don’t worry – it won’t affect the taste!

Lightly browned in the pan and then crisped up in the oven while I made the salad, these would be a wonderful appetizer if made smaller. But they are just as delicious and decadent as your entree, served on a bed of peppery arugula in a light lemon vinaigrette (with Parmesan shavings over the top, of course).

Gruyere Risotto Cakes

Ingredients:

  • Kosher salt
  • 1 cup uncooked Arborio rice
  • 1/2 cup sour cream
  • 2 eggs
  • 3 tablespoons minced green onions
  • 1 1/4 cups grated Gruyere cheese
  • 1/4 cup grated Parmesan cheese
  • 1/2 teaspoon freshly ground black pepper
  • 3/4 cup panko bread crumbs
  • Good olive oil
  • Baby arugula
  • Juice from 1 lemon

Bring a large pot of water to a boil over medium-low heat and add 1/2 tablespoon salt and the Arborio rice. Cook, stirring occasionally, for 20 minutes. The grains of rice will be quite soft. Drain the rice in a sieve and run under cold water until cool. Drain well.

Meanwhile, whisk together the sour cream, eggs, green onions, cheeses, 1 1/4 teaspoons of salt, and the pepper in a medium bowl. Add the cooled rice and mix well. Cover with plastic wrap and refrigerate for 2 hours or overnight, until firm.

When ready to cook, preheat the oven to 250 degrees F.

Spread the panko in a shallow dish. Heat 3 tablespoons of olive oil in a large skillet over medium-low heat. Form balls of the rice mixture using an ice-cream scoop or a large spoon. Pat the balls into patties 3 inches in diameter and 3/4-inch thick. Place patties in the panko, turning once to coat. Place the patties in the hot oil and cook, turning once, for about 3 minutes on each side until the risotto cakes are crisp and nicely browned. Place on a sheet pan lined with parchment paper and keep warm in the oven for up to 30 minutes – increase the heat to 350 if the cakes fell apart in the frying process and need to be crisped.

Continue cooking in batches, adding oil as necessary, until all the cakes are fried.

Meanwhile, prepare your salad.

Whisk juice of 1 lemon with 1/3-1/2 c. EVOO and salt and pepper to taste. Pour over arugula and finish with Parmesan shavings.

To serve, place hot cakes on top of arugula salad and sprinkle with a little more salt and pepper. When you bite in, the rice will be creamy and flavored with all the nutty Gruyere and light onions. The arugula will wilt under the heat and the Parmesan will soften. Just fabulous!

To reheat, place cakes on baking sheet and heat in 350-degree oven until they start to sizzle.

Enjoy, friends! xoxo
Roasted Shrimp with Fennel and Feta

This is one of those dishes that I just couldn’t photograph in a way to fully illustrate how incredibly delicious it is. A serious problem for someone always pointing a camera at her plate.

Regardless, I hope you read on, as this is one of the more beautifully delicious shrimp dishes I have made, and all in one pot. Roasting the shrimp with freshly sauteed fennel, tomatoes and herbs, topped with homemade breadcrumbs and crumbled feta cheese and a squeeze of lemon. Fresh and light and just delicious.

I adapted it from Ina Garten, of course, and my version is even simpler than hers, without sacrificing any flavor.

Roasted Shrimp with Fennel and Feta

Ingredients (serves 2-3):

  • Good olive oil
  • 1 1/2 cups diced fennel (1 bulb)
  • 1 tablespoon minced garlic (3 cloves)
  • 1/4 cup dry white wine
  • 1/2 c. chopped fresh tomatoes
  • 1 teaspoon dried oregano
  • Pinch dried anise seed
  • Kosher salt and freshly ground black pepper
  • 1 pound shrimp, peeled and deveined
  • 3 ounces feta cheese, coarsely crumbled
  • 1 cup fresh torn pieces of bread
  • 3 tablespoons minced fresh parsley
  • 1 teaspoon grated lemon zest
  • 2 lemons

Preheat the oven to 400 degrees.

Heat 2 tablespoons of olive oil in 10- or 12-inch heavy ovenproof skillet over medium-low heat. Add the fennel and garlic and sauté for 8 to 10 minutes, until tender. Add the wine and bring to a boil, scraping up any browned bits clinging to the bottom of the skillet, and cook until the liquid is reduced by half, 2 to 3 minutes.

Add the tomatoes, oregano, anise seed, 1 teaspoon salt and 1/2 teaspoon pepper to the skillet. Simmer over low heat, stirring occasionally, for 10 to 15 minutes.

Arrange the shrimp in one layer over the tomato mixture in the skillet.

Scatter feta evenly over the shrimp. In bowl of a food processor, add the bread and pulse until it becomes small crumbs. Add parsley, lemon zest and 2 tablespoons of olive oil and pulse to combine. Sprinkle evenly over the shrimp.

Bake the shrimp for about 15 minutes, until the shrimp are cooked through and the bread crumbs are golden brown.

Squeeze the juice of 1 lemon over the shrimp. Serve hot with wedges of lemon.

This totally works. The shrimp loves the lemon and lemony feta, and the fennel and tomato mixture creates a delicious sauce to hold it all. We had ours with a simple green salad and crusty bread to mop up the juices. Perfect for a summer dinner and I had plenty of leftovers for lunch!

Enjoy, friends xoxo

Peach and Blueberry Crisp

Absolutely nothing tastes more like summer than a perfectly ripe peach. Let the juices run down my arm and between my fingers in a sticky mess – it’s sweet and floral and heavenly.

Peach season has landed, so I am always looking for ways to use peaches about to become too ripe, but were so cheap at the grocery store that I couldn’t help myself.

Grant recently hosted a big Cabinpalooza at his mountain home in Virginia.

It turned out to be a big foodie fest/drinking fest/fishing contest. With so many fabulous cooks bringing fresh veggies, flowers and fruits straight from their gardens (blog post to come!), I decided to hang back in the wings and focus on dessert.

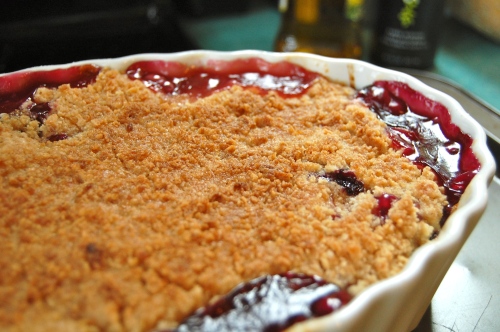
I made this peach and blueberry crisp. Blueberries add a bit of acidity to the super sweet peaches, and of course the color is fabulous. The crust is always the best part, in my opinion. Nobody was disappointed.

Adapted from Ina Garten.

Peach and Blueberry Crisp

Ingredients:

For the fruit:

  • 2 pounds firm, ripe peaches (6 to 8 peaches)
  • 2 teaspoons grated lemon zest
  • 2 tablespoons freshly squeezed lemon juice
  • 1/2 cup granulated sugar
  • 1/4 cup all-purpose flour
  • 1 cup fresh blueberries (1/2 pint)

For the crumble:

  • 1 cup all-purpose flour
  • 1/3 cup granulated sugar
  • 1/4 cup light brown sugar, lightly packed
  • 1/2 teaspoon kosher salt
  • 1/4 teaspoon ground cinnamon
  • 1/4 pound (1 stick) cold unsalted butter, diced

Preheat the oven to 350 degrees F.

Peel the peaches, slice them into thick wedges, and place them in a large bowl. Add the lemon zest, lemon juice, granulated sugar, and flour. Toss well. Gently mix in the blueberries. Allow the mixture to sit for 5 minutes. Spoon the mixture into baking dish.

For the topping, combine the flour, granulated sugar, brown sugar, salt, cinnamon, and the butter in a food processor. Pulse until the butter is the size of peas. Rub the mixture with your fingertips until it’s in big crumbles, then sprinkle evenly over the fruit. Place the baking dish on a sheet pan lined with parchment paper or foil and bake for 50-55 minutes, until the tops are browned and crisp and the juices are bubbly.

Mine didn’t get as browned on top as I desired, so I just broiled it a bit at the end for a nice crust.

Serve warm or at room temperature – goes very well with vanilla ice cream!

Enjoy, friends! xoxo

Strawberry and Pistachio Tart

Glorious spring days, where the grass seems to glow electric green and the daffodils trumpet a louder yellow … just makes you want to kick off your flipflops and get elbow deep in buttery pastry, silky egg cream and vibrantly red strawberries.

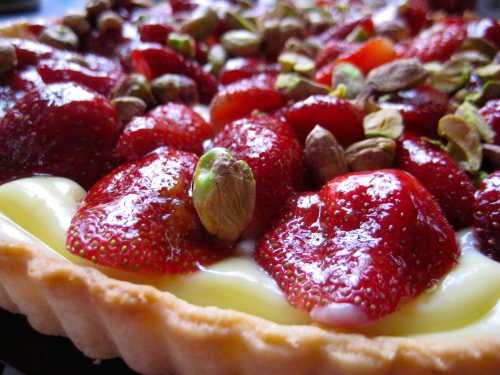
Adding smoky green pistachios creates a texture and color contrast that I loved in this traditional strawberry tart recipe. It offers a bit of earthy crunch to the super sweet filling.

The recipe is for smaller tartlets, but I made it in one large tart pan, which turned out fine. Just don’t expect your pieces to come out clean – the pastry cream is all goopy, like a thick pudding. Reading the reviews, the crust does indeed get quite hard to cut through with your fork –  which I think is good, because the crust needs to stand up to the soft custard inside.

Recommended for a crowd…

Strawberry and Pistachio Tart

Ingredients:

  • 1 1/4 cups all-purpose flour
  • 3 tablespoons sugar
  • 1/2 teaspoon kosher salt
  • 6 tablespoons (3/4 stick) cold unsalted butter, diced
  • 2 tablespoons cold shortening
  • 1/4 cup ice water
  • 2 cups Pastry Cream, recipe follows
  • 2 pints whole strawberries, hulled and halved
  • 1/3 cup apricot jelly
  • 3 tablespoons shelled pistachios, roughly chopped

Combine the flour, sugar and salt in a small bowl and place in the freezer for 30 minutes. Put the flour mixture in the bowl of a food processor fitted with a steel blade. Add the butter and shortening and pulse about 10 times, or until the butter is in the size of peas. Add the ice water and process until the dough comes together. Dump on a well-floured board and form into a disk. Wrap in plastic and chill for at least 30 minutes.

Meanwhile, make pastry cream:

Pastry Cream

Ingredients:

  • 5 extra-large egg yolks, room temperature
  • 3/4 cup sugar
  • 3 tablespoons cornstarch
  • 1 1/2 cups scalded milk
  • 1/2 teaspoon pure vanilla extract
  • 1 tablespoon unsalted butter
  • 1 tablespoon heavy cream

In the bowl of an electric mixer fitted with the paddle attachment, beat the egg yolks and sugar on medium-high speed for 4 minutes, or until very thick. Reduce to low speed, and add the cornstarch.

With the mixer still on low, slowly pour the hot milk into the egg mixture. Pour the mixture into a medium saucepan and cook over low heat, stirring constantly with a wooden spoon, until the mixture thickens, 5 to 7 minutes. Don’t be alarmed when the custard comes to a boil and appears to curdle; switch to a whisk and beat vigorously. Cook, whisking constantly, for another 2 minutes; the custard will come together and become very thick, like pudding. Stir in the vanilla, butter, and heavy cream. Pour the custard into a bowl. Place plastic wrap directly on the custard and refrigerate until cold.

While the pastry cream chills, preheat the oven to 375 degrees F.

Roll out the dough and fit into your tart pan with removable side. Don’t stretch the dough when placing it in the pans or it will shrink during baking. Cut off the excess by rolling the pin across the top the pan. Line the tart shell with a piece of buttered aluminum foil, butter side down, and fill with dried beans or rice. Bake for 10 minutes. Remove the beans and foil, prick the bottom of the shell all over with a fork, and bake for another 15 to 20 minutes until lightly browned. Set aside to cool.

Before serving, fill the tart shell with the pastry cream. Arrange the berries decoratively on top of the cream. Melt the apricot jelly with 1 teaspoon of water and brush the top of the tart. I love the way it looks like a star burst!

Sprinkle with pistachios, if using, and serve.

Enjoy, friends! xoxo
White Pizza with Arugula and Prosciutto

In the universe of hand-thrown pizzas, I’m the first to turn to the experts for that crispy-yet-chewy crust, perfect cheese blend and whatever magic they put on top.

But that all changed recently, when I made my version of Ina Garten’s White Pizza with Arugula salad on top.

White pie with arugula is a popular pizza – the peppery arugula, tossed in a vinaigrette, adds a crisp bite to the ooey gooey cheese. My addition of thinly sliced prosciutto adds a veil of salty pork to the party that makes all the other ingredients have more fun.

I made the dough the day before (veering from the recipe), which I think made it easier to work with. The garlic-chili-thyme oil is brilliant – be sure to spoon some of the soft garlic bits onto the pizza as you drizzle – they get all sweet and smooth. And the simple lemon vinaigrette for the arugula just brightens the greens. If I could marry a pizza, it would be this pizza.

Grant said this is the best pizza he’s ever had. And he’s lived in NYC!

White Pizza with Arugula and Prosciutto

Ingredients:

FOR PIZZA

  • 1 1/4 cups warm (100 to 110) water
  • 2 packages dry yeast
  • 1 tablespoon honey
  • Good olive oil
  • 4 cups all-purpose flour, plus extra for kneading
  • kosher salt
  • 4 cloves garlic, sliced
  • 5 sprigs fresh thyme
  • 1/4 teaspoon crushed red pepper flakes

For the topping:

  • 2 cups grated fontina cheese (8 ounces)
  • 1 1/2 cups grated mozzarella cheese (7 ounces) – I forgot to get this, so just used leftover manchego – use up your leftover cheeses here!
  • 8 ounces creamy goat cheese crumbled
  • 1/2 lb. thinly sliced prosciutto

For the VINAIGRETTE:

  • 1/2 cup good olive oil
  • Juice of 2 lemons
  • Freshly ground black pepper
  • 8 ounces baby arugula

Mix the dough: Combine the water, yeast, honey and 3 tablespoons of olive oil in the bowl of an electric mixer fitted with a dough hook. When the yeast is dissolved and fizzing (10 min.), add 3 cups of flour, then 2 teaspoons salt, and mix on medium-low speed. While mixing, add up to 1 more cup of flour, or just enough to make a soft dough. Knead the dough for about 10 minutes until smooth, sprinkling it with the flour as necessary to keep it from sticking to the bowl.

When the dough is ready, turn it out onto a floured board and knead it by hand a dozen times. It should be smooth and elastic. Let it rise.

Place the dough in a well-oiled bowl and turn it to cover it lightly with oil. Cover the bowl with plastic wrap and allow the dough to rise at room temperature for 30 minutes (or longer, if you go out).

Meanwhile, place 1/2 cup of olive oil, the garlic, thyme and red pepper flakes in a small saucepan and bring to a simmer over low heat. Cook for 10 minutes, making sure the garlic doesn’t burn. Set aside.

Dump the dough onto a board and divide it into equal portions (we made two, but you can make up to six). Place the doughs on sheet pans lined with parchment paper and cover them with a damp towel. Allow the dough to rest for 10 minutes. Use immediately, or refrigerate for up to 4 hours (Note: I instead just punched the risen dough down and left covered in the fridge overnight).

Press and stretch each ball into an 8-inch circle and place on each sheet pan lined with parchment paper. (If you’ve chilled the dough, take it out of the refrigerator approximately 30 minutes ahead to let it come to room temperature.)

Brush the pizzas with the garlic oil, and sprinkle each one liberally with salt and pepper. Sprinkle the pizzas evenly with fontina, mozzarella and goat cheese. Drizzle each pizza with 1 tablespoon more of the garlic oil and bake for 10 to 15 minutes, until the crusts are crisp and the cheeses begin to brown.

Top with prosciutto slices.

Meanwhile, whisk together 1/2 cup of olive oil, the lemon juice, 1 teaspoon salt and 1/2 teaspoon pepper. Add the greens.

When the pizzas are done, place the arugula in a large bowl and toss with just enough lemon vinaigrette to moisten. Place a large bunch of arugula on each pizza and serve immediately.

When you slice in, the cheese will be delightfully messy, the prosciutto will be blooming with that slightly gamey flavor and the arugula will be starting to wilt. Yum.

Enjoy, friends! xoxo
Coeur a la Creme

I had a dream one night that I was flying through clouds made of whipped cream. It reminded me of those old commercials where the angels sat on clouds and ate cream cheese, flavoring some of it with strawberries or blueberries.

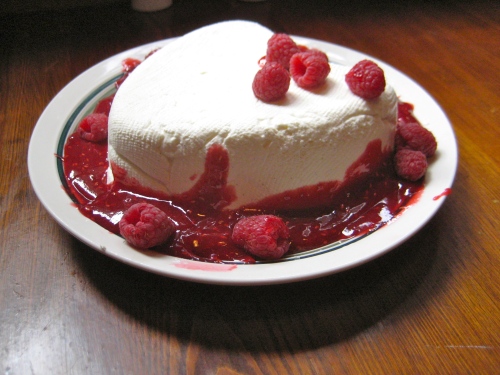
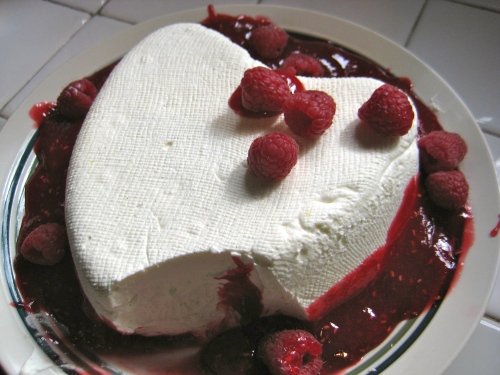
A coeur a la creme is a dreamy pillow of whipped cream cheese, heavy cream, powdered sugar, vanilla bean and lemon zest. The consistency is so airy that it feels like eating the top of an ice cream sundae, but it is dense enough to form the beautiful heart shape you see below.

I like mine framed by a moat of raspberry sauce spiked with Gran Marnier.

This recipe is a bit of a story. I have wanted to make it for years, after seeing it on Barefoot Contessa. I decided to make it this year for Valentine’s Day, which required I put the special dish on hold at Sur la Table. When I finally made it, I forgot to buy heavy cream and tried half/half, which didn’t have the milk fat needed to make it fluff together. So I threw that whole batch out (wah).

I got it right the second time – just watch your Gran Marnier, that stuff gets strong!

Coeur a la Creme with Raspberry Sauce

Ingredients:

  • 12 ounces cream cheese, at room temperature
  • 1 1/4 cup confectioners’ sugar
  • 2 1/2 cups cold heavy cream
  • 2 teaspoons pure vanilla extract
  • 1/4 teaspoon grated lemon zest
  • Seeds scraped from 1 vanilla bean
  • Raspberry Sauce, recipe follows
  • 2 half-pints fresh raspberries

Place the cream cheese and confectioners’ sugar in the bowl of an electric mixer fitted with the paddle attachment and beat on high speed for 2 minutes. Scrape down the beater and bowl with a rubber spatula and change the beater for the whisk attachment. With the mixer on low speed, add the heavy cream, vanilla, lemon zest, and vanilla bean seeds and beat on high speed until the mixture is very thick, like whipped cream (about 5 min.).

Line a coeur a la creme dish (or 7-inch sieve) with cheesecloth (or paper towels) so the ends drape over the sides and place it on something to catch the liquid (if using a sieve, suspend it over a bowl, making sure that there is space between the bottom of the dish and the bottom of the bowl for the liquid to drain). Pour the cream mixture into the cheesecloth (I doubled my cheesecloth layer), fold the ends over the top, and refrigerate overnight. Mine drained just a few drops of liquid, so don’t expect a flood.

You’ll love the way the cheesecloth leaves an impression on the surface:

Now, make the raspberry sauce:

  • 1 half-pint fresh raspberries
  • 1/2 cup sugar
  • 1 cup seedless raspberry jam
  • 2 tablespoons orange-flavored liqueur (Grand Marnier)

Place raspberries, sugar, and 1/4 cup water in a small saucepan. Bring to a boil, lower the heat, and simmer for 4 minutes. Pour the cooked raspberries, the jam, and liqueur into a food processor or blender and process until smooth. Chill.

To serve, unmold the coeur a la creme onto a plate and spoon sauce around the edges. Tumble raspberries all around and dig in!

I honestly can’t have more than one or two spoonfuls at a time – it is very rich. This would be PERFECT for a spring or summer dinner party because it makes so much and is so cool and soft to eat.

Enjoy, friends! xoxo
Pesto, goat cheese and sundried tomato palmiers

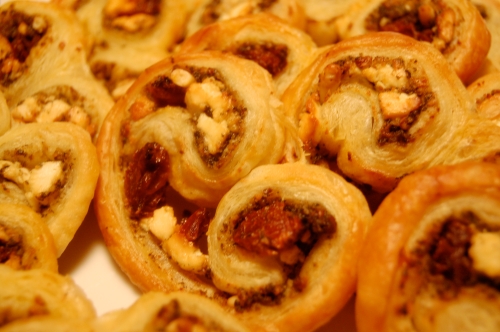
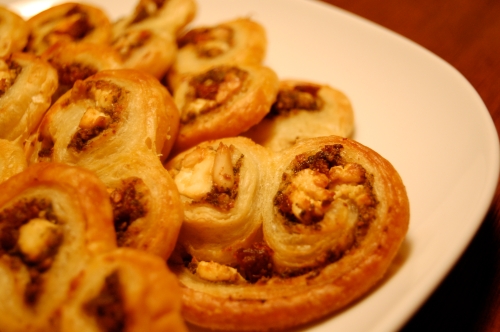
Puff pastry is the after-work-cocktail-hour-hostess’s best friend. Simply roll it out, cover it in things you like, fold up, slice and bake. At a small get-together recently, I made Ina Garten’s savory palmiers to go with Grant’s grilled chicken and ginger-infused vodka cocktail.

Using my friend Tonya’s homemade pesto and some goat cheese, sundried tomatoes and pine nuts, these really do make a wonderful and easy little appetizer. They look like little elephant ears.

Pesto, Goat Cheese and Sundried Tomato Palmiers

Ingredients:

  • 1 sheet puff pastry, rolled out to 9×12 inches
  • 1/4 c. pesto
  • 1/4 c. goat cheese crumbles
  • 1/4 c. toasted pine nuts
  • 1/4 c. sliced sundried tomatoes packed in olive oil

Cover puff pastry with pesto, then sprinkle on cheese, nuts and tomatoes. Starting on short ends, roll the opposite ends halfway to the middle, then roll them over again to meet at the center. Then, roll one half on the other, pressing down lightly. Cover in plastic wrap and chill for 45  min. or overnight.

Preheat oven to 400. Slice dough in 1/4-inch pieces and place 1 inch apart on baking sheet. Bake for 14 min. or until golden brown. Serve warm.

Enjoy, friends! xoxo

Spanikopita

Every year after Thanksgiving, I find myself craving something as far from roasted bird as possible. These are the times for Thai takeout, sushi eaten curled up on the couch and breakfast-for-dinner.

A nice meal my Greek-looking friend and I recently enjoyed would be perfect for such times. Ina Garten’s take on that classic Greek dish: spanikopita.

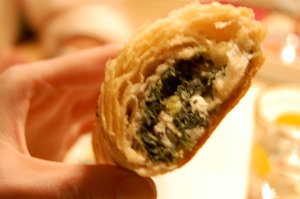
Ina creates a robustly flavored filling of spinach, toasted pine nuts, onion, scallions, Parmesan, nutmeg and cubes of feta cheese that becomes sealed in a packet of buttery phyllo dough that flakes off as you bite into it.

Working with phyllo is always aggravating, and this time was no different. Next time, I will make fully sure that my dough it completely thawed before working with it – lest it break off into a million shards.

We used less than half the recipe, freezing the rest for another time. We made six spanikopitas, which we served with Grant’s classic cucumber/tomato/onion salad like his Southern mama used to make.

Spanikopita

Ingredients:

  • 1/4 cup good olive oil
  • 1 cup chopped yellow onion
  • 3 scallions, white and green parts, chopped
  • 2 (10-ounce) packages frozen chopped spinach, defrosted
  • 4 extra-large eggs, lightly beaten
  • 3 tablespoons freshly grated Parmesan cheese
  • Plain dry bread crumbs
  • 1 teaspoon grated nutmeg
  • 2 teaspoons kosher salt
  • 1 teaspoon freshly ground black pepper
  • 2 cups small-diced feta cheese (12 ounces)
  • 3 tablespoons toasted pine nuts
  • 24 sheets frozen phyllo dough, defrosted
  • 1/4 pound (1 stick) unsalted butter, melted
  • Flaked sea salt, for sprinkling

Preheat the oven to 375 degrees F.

Heat the olive oil in a medium saute pan, add the onion, and cook for 5 minutes over medium-low heat. Add the scallions, and cook for another 2 minutes until the scallions are wilted but still green. Meanwhile, gently squeeze most of the water out of the spinach and place it in a large bowl.

When the onion and scallions are done, add them to the spinach. Mix in the eggs, Parmesan cheese, 3 tablespoons bread crumbs, the nutmeg, salt, and pepper. Gently fold in the feta and pine nuts.

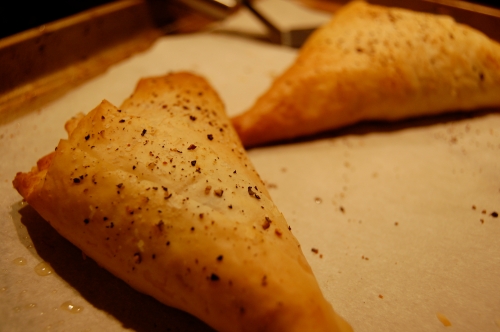
Place 1 sheet of phyllo dough flat on a work surface with the long end in front of you. Brush the dough lightly with butter and sprinkle it with a teaspoon of bread crumbs. Working quickly, slide another sheet of phyllo dough on top of the first, brush it with butter, and sprinkle lightly with bread crumbs. (Use just enough bread crumbs so the layers of phyllo don’t stick together.) Pile 4 layers total on top of each other this way, brushing each with butter and sprinkling with bread crumbs. Cut the sheets of phyllo in half lengthwise. Place 1/3 cup spinach filling on the shorter end and roll the phyllo up diagonally as if folding a flag. Then fold the triangle of phyllo over straight and then diagonally again. Continue folding first diagonally and then straight until you reach the end of the sheet. The filling should be totally enclosed. Continue assembling phyllo layers and folding the filling until all of the filling is used. Place on a sheet pan, seam sides down. Brush with melted butter, sprinkle with flaked salt, and bake for 30 to 35 minutes, until the phyllo is browned and crisp. Serve hot.

This was so delicious that I instantly burned my tongue so bad that I had to suck on ice for the next 15 minutes. But it was WORTH IT!

Enjoy, friends! xoxo