Tag Archives: recipe

Swiss Chard and Mushroom Galette with Whole Wheat Crust

20140430-143502.jpg

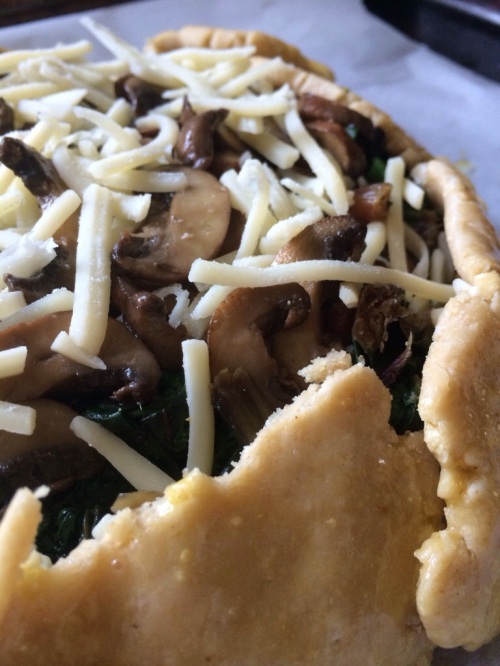
Swiss chard seems to be riding the popularity train with kale. Thick, slightly bitter, slightly tough greens that are hearty enough to weather the chilly months in your garden. They also happen to be very good for you, so my healthy friends say, which is why this recent Bon Appetit recipe appealed to me. Plus I loved the rustic look of it.

Savory galettes are a wonderful thing, don’t you think? I love the idea of folding pastry around something other than spiced apples or glossy peaches. It’s a bit of a mind trick (should this be sweet or salty?) and feels very French to eat pastry for dinner.

I went through the trouble of making the whole-wheat crust by hand, folding it to cup a mixture of sauteed mushrooms, chard, garlic and Swiss cheeses. The whole process reminded me what a bother it is cooking from scratch! Can’t believe I used to cook like this all the time, but I’ll stick with  my once-weekly cooking projects until I get my hands free.

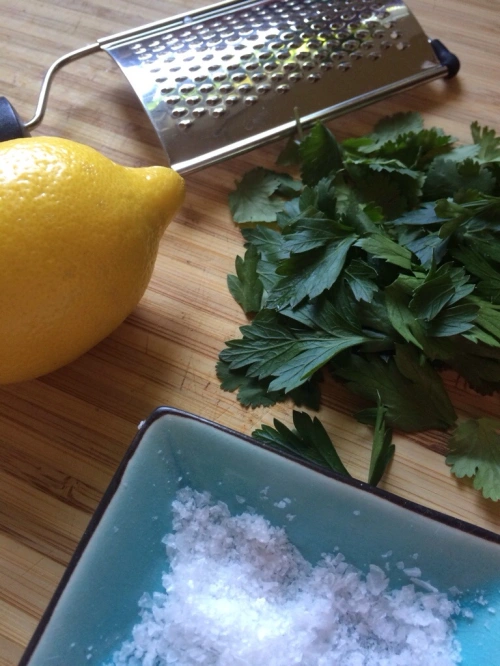
I didn’t follow the original recipe exactly just because I forgot to buy ricotta cheese. And the new, frugal, time-saving me only goes grocery shopping one time per week. We enjoyed the nuttiness of the Swiss cheeses, so use your preference. I believe goat cheese would also be good, notably with the fresh lemon and grassy herbs.

Original Recipe:

Swiss Chard and Mushroom Galette

Ingredients:

WHOLE WHEAT DOUGH

  • 1 cup all-purpose flour
  • 1 cup whole wheat flour
  • 1 teaspoon kosher salt
  • ¾ cup (1½ sticks) chilled
  • unsalted butter, cut into pieces
  • 1 tablespoon apple cider vinegar

Pulse all-purpose flour, whole wheat flour, and salt in a food processor to combine. Add butter and pulse until mixture resembles coarse meal with a few pea-sized pieces of butter remaining. Drizzle with vinegar and ¼ cup ice water. Pulse just until a shaggy dough comes together; lightly knead until no dry spots remain (do not overwork). Pat into a disk and wrap in plastic. Chill at least 2 hours. (let sit at room temp for around 30 minutes to soften before rolling out)

GALETTE

  • 1 cup ricotta (or mix of 1 c. Swiss/Gruyere cheeses)
  • Kosher salt and freshly ground
  • black pepper
  • 3 tablespoons olive oil, divided
  • 1 package mushrooms, sliced, about 1 cup (I used baby bellas)
  • 1 garlic clove, finely chopped
  • 1 bunch large Swiss chard, ribs and stems removed, leaves cut into bite-size pieces (I bought Trader Joe’s pre-chopped bag of chard)
  • 1/4 fresh herbs (I used parsley and cilantro leaves)

Preheat oven to 400°. Season ricotta with kosher salt and pepper; set aside (skip this step if not using ricotta).

Heat 1 Tbsp. oil in a large skillet over medium-high heat. Add mushrooms; season with kosher salt and pepper and cook, stirring occasionally, until golden brown and crisp, about 5 minutes. Transfer to a small bowl.

Heat 1 Tbsp. oil in same skillet over medium heat. Cook garlic, stirring, until fragrant, about 30 seconds. Add half of chard, season with kosher salt and pepper, and cook, tossing, until slightly wilted. Add remaining chard and cook,
tossing occasionally, until completely wilted, about 4 minutes. Remove from heat; season with salt and pepper. Set aside.

Roll out dough on a lightly floured sheet of parchment to a 14” round about ⅛” thick. Transfer on parchment to a baking sheet. Spread three-fourths of cheese over dough, leaving a 1½” border. Top with reserved chard, then
mushrooms. Sprinkle remaining cheese over top. Bring edges of dough up and over filling, overlapping as needed, to create a 1½” border; brush with egg.

20140430-143556.jpg

Bake galette, rotating once, until crust is golden brown and cooked through, 35–40 minutes. Let cool slightly on baking sheet.

Sprinkle herbs over top, then zest and juice of lemon, cracked pepper and flaky sea salt.

20140430-143608.jpg

Slice, and enjoy, friends! xoxo

20140430-143649.jpg

Zucchini Bread

Quick breads – helping zucchini haters like myself enjoy squash for a lifetime.

I hate almost anything in the squash family – always have. So why I ever decided to make zucchini bread for the first time 3 years ago, I don’t know. But I do know that the result is such a soft and sweet slice of bread. And with just the right texture from those ribbons of zucchini.

The only thing I hate worse than squash is nuts in my brownies, cookies, ice cream and bread. So I adapted this to my pickiness (from Cooks Illustrated).

Zucchini Bread

Ingredients:

  • 2 c. flour
  • 1 lb. zucchini, ends trimmed, grated on box grater
  • 3/4 c. sugar
  • 1 tsp baking soda
  • 1 tsp baking powder
  • 1/2 tsp salt
  • 1/4 c. plain yogurt
  • 2 large eggs, beaten
  • 1 T lemon juice
  • 6 T unsalted butter, melted and cooled

Heat oven to 375. Grease bottom and sides of 9×5-inch loaf pan. Dust with flour, tapping out excess.

Toss zucchini with 2 T sugar and set in drainer in sink for 30 min.

Meanwhile, combine flour, baking soda, baking powder and salt. Set aside.

Whisk together remaining 1/2 c. sugar plus 2 T sugar, yogurt, eggs, lemon and melted butter. Set aside.

When zucchini has drained, squeeze it between paper towels to extract any excess juice. Stir zucchini in with yogurt mixture, then add to flour mixture and stir until just moistened. Scrape into prepared pan and smooth top.

Bake until loaf is golden brown and tester comes out clean – 55 to 60 minutes, rotating halfway through. Cool in pan 10 min, then transfer to wire rack for at least 1 hour before serving.

Can be stored, wrapped in plastic, for up to 3 days. But be sure to eat it by then because it tends to get a bit gummy!

The weather is dropping below 90 every day – fall must be right around the corner. What better for fall than a warm, comforting, sweet loaf of bread?

Enjoy, friends! xoxo

Quick and Easy Pickles

Pickles! Our CSA box has provided pounds and pounds of pickling cucumbers, so I finally learned how to make pickles, out of necessity. Out of survival!

This easy and quick recipe is from Cook’s Illustrated and provides a wonderfully crisp icebox pickle. I say “icebox” because you don’t preserve the pickles, but they lasts weeks in your fridge. And the taste just gets better over time – less vinegary, more dilly.

I want to play with this recipe. Next time, I would add whole garlic cloves in the jars and perhaps a dash more salt and some chili flakes or something spicy.

These are wonderful as a snack or along with your favorite ‘mater sandwich. Grant was disappointed when I forgot them for our picnic along the Virginia Creeper Trail. But then he remembered that I made roast-beef sandwiches with fresh tomato, arugula and pesto mayo.

Quick and Easy Pickles

Ingredients:

  • 1 pound pickling cucumbers, sliced into spears
  • 1 T kosher salt
  • 1/2 c. plus 1 T chopped fresh dill
  • 1 T peppercorns
  • 1 T dried dill weed
  • 6 medium garlic cloves, smashed
  • 1 1/2 c. distilled white vinegar
  • 1/2 c. ice

Toss cucumbers with salt in colander set over bowl and let stand 1 hour. Discard any drained liquid.

Place 1/2 c. fresh dill, peppercorns, dried dill and garlic in coffee filter or cheesecloth and tie tightly with kitchen twine. Bring spice bag and vinegar to boil in medium saucepan. Reduce heat to low and add cucumbers. Cover and cook until cucumbers turn dull olive brown, 5 min. If some are still green in spots, push them down into the liquid and continue to cook until brown. But do not over-cook! Discard spice bag.

Transfer cucumbers and liquid to large bowl and add ice, stirring until melted. Stir in remaining T fresh dill. Refrigerate, uncovered, at least 1 day, preferably 2. I divided mine into jars with extra brine that I made to keep them moist.

Enjoy, friends! xoxo

Lemon-Oregano Roast Chicken

As many of you know, Grant and I are sharing a CSA this year from Shore Farm Organics. CSA stands for Community Supported Agriculture – basically, you sign up to receive a box of farm-fresh produce every week from the farmers’ market.

Every Tuesday, I visit the cobblestone market downtown and pick up my package, overflowing with tender fennel fronds, crisp lettuces, fresh herbs and an assortment of other items: chard, beets, squash, cucumbers, cauliflower, etc. The assortment is different each week, which is why we love it!

Recently, we got a lot of fresh oregano, rosemary and basil. I had no idea what I’d do with all that oregano until I considered a Greek-inspired roasted chicken, with a lemon-oregano compound butter rubbed all over the bird.

And so this meal was born, adapted from my traditional roast chicken recipe. The lemon and herbs combo permeates all of the chicken meat, providing you with days of yummy leftovers.

Lemon-Oregano Roast chicken

Ingredients:

  • One 3-4 lb. chicken, giblets removed, rinsed and patted dry
  • 2 T unsalted butter, at room temperature
  • Zest of one lemon
  • 1 lemon, cut in half
  • 1 bunch fresh oregano
  • 1 bunch fresh thyme
  • S&P
  • Paprika
  • 3 cloves garlic, unpeeled

Preheat oven to 425 degrees.

Mix softened butter with lemon zest, pinch of S&P and 1 T chopped fresh oregano. Set aside.

Place chicken on roasting rack set in roasting pan. Stuff it with remaining oregano, zested lemon sliced in half, garlic and rosemary. Rub most of the butter mixture under the skin, then rub the remaining over the outside of the chicken skin, just to coast. Sprinkle chicken with salt, pepper and paprika. Tuck the wings under the body and tie the legs together with kitchen twine (optional).

Place chicken in oven and roast for 1:15 to 1:30 hours. When you pierce between the leg and thigh, the juices should run clear. When done, remove from oven and let rest 20 min. That will give you enough time to prepare a salad, toast up some bread or make your favorite Greek-inspired couscous (as I did).

I set my bird on a tray with more fresh herbs, just to be pretty. The smell, the sight and the taste of the chicken was all perfect – proving that roast chicken is good at any time of year!

Enjoy your next chicken dinner, friends! xoxo