Ricotta-Stuffed Squash Blossoms with Warm Tomato Sauce

20140727-145705-53825979.jpg

This is a story about the plight of the male squash blossom.

Squash blossoms, I have learned, are either male or female. Females bloom, become fertilized and swell to produce the fruit. Males bloom as well, fanning the sky with their magical essence that floats into the soft yellow petals of any female nearby…with the help of our winged friends. And once this job is done, the males lose their purpose. And, as so often happens in the wild, they die.

I came upon this realization as I recently researched how to harvest one’s own squash blossoms for the purposes of cooking. We are lucky enough to have a glorious growing season in N.C., and planted one too many yellow summer squash in our little garden patch. Grant clips the soft yellow squash, but just as many “male” blossoms stay there, not producing fruit, being wasted.

Until I came along with a desire to stuff them with creamy ricotta and herbs.

If you are lucky enough to find squash blossoms at the market, I would cook them within 24 hours. Garden-grown is always best, of course, as I ate mine less than 10 hours after picking, which was ideal because some were still wide open and easy to fill. I leave a bit of stem – makes for easier handling – and be sure to clean them of any bugs and pull that little…”male thingy” out from inside. Picking in morning is best, as the flowers will be open.

You can find a much more professional recipe elsewhere, such as epicurious.

Ricotta-Stuffed Squash Blossoms with Warm Tomato Sauce

Use 6-8 fresh squash blossoms, cleaned, stamen removed.

Filling:

Mix together 1/2 c. ricotta (I used fat-free ricotta from Trader Joe’s, but by all means go whole milk!), 1 egg yolk, 4-5 fresh sliced basil leaves, S&P to taste.

Using a spoon or your hands, push about 1 T filling into each flower. Careful! Gently twist the top closed.

Batter:

In a medium bowl, mix 1 c. AP flour with enough white wine to make it look like pancake batter. That is as technical as I get. I used a really sweet wine that I hated, and it turned out great. Probably close to 1 c. wine.

Meanwhile, heat 2 inches of canola oil in a deep pan until shimmering – probably close to 300 degrees but I didn’t check. Test and learn! I also didn’t have enough oil, so mine were shallow-fried and a little flat on one side. Oh well!

Dip each stuffed blossom in the batter and let excess drip off before dropping into hot oil.

20140727-145706-53826536.jpg


Make sure squash brown on all sides – it will only take a few minutes. Sprinkle with coarse salt when you remove them to a towel to drain and cool.

20140727-145707-53827289.jpg

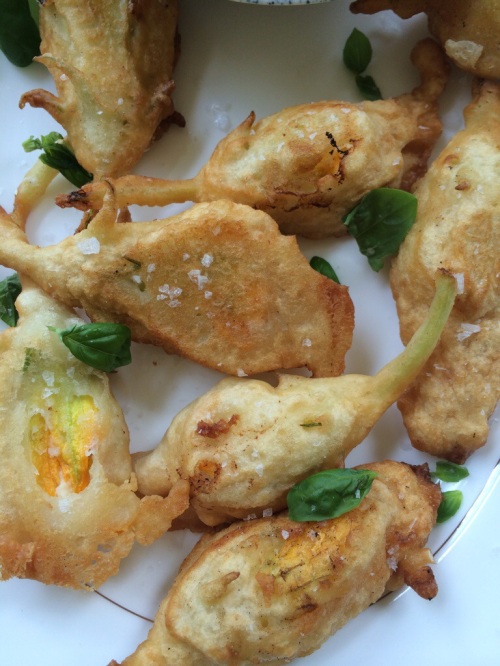
Serve with warm tomato sauce, or, as I have been calling it, tomato oil.

In small saucepan, cook 1 large clove garlic in 2 T olive oil and a pinch of chili flakes. Add 1 large chopped garden tomato or equivalent. Cook over low until soupy – season to taste.

20140727-145706-53826931.jpg

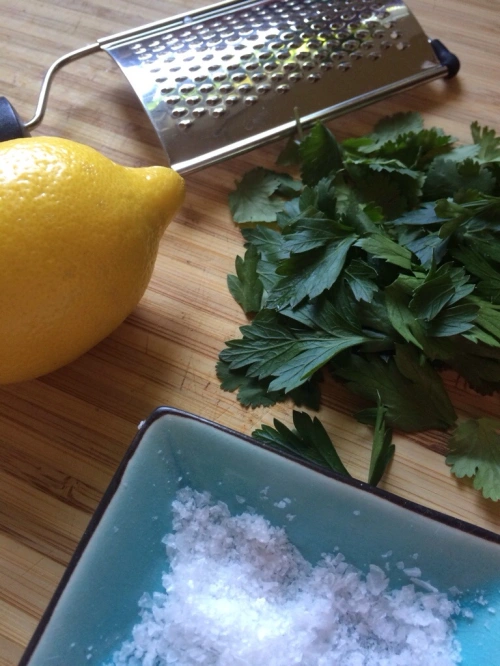
I served mine with extra basil and Maldon sea salt sprinkled over. It was lovely. The crust was crunchy and the blossom and filling were so soft inside. It felt like biting into a Krispy Kreme donut. You can really taste the wine in the batter.

The garlicky tomato sauce is a perfect complement. See how that ricotta just oozes out…

20140727-145706-53826268.jpgEnjoy, friends! xoxo


Smoked Mozzarella and Truffled Mushroom Pizza + Blog Tour!

Blog Tour! I was so flattered when the amazing Bethany from My Fake Food Blog asked if I would participate in a blog tour. We’re all writing about our creative process and I was happy to be considered because I’ve been so MIA lately.

Keep reading for a quick and easy pizza recipe that will blow your mind…

1. What are you working on?

Catching up on my blog archive! I have a number of dishes ready to post – just need to carve out 30 minutes here and there to get the job done. I find I’m most creative on the weekends, when I have more time for “me” and to be inspired by the light and warm air.

2. How does your work differ from others of its genre?

I try to keep it strictly about the food and rarely share personal photos or stories. I’ve had blogs in the past that were more like personal diaries. I learned the hard way that it sucks putting yourself out there and inviting anonymous people to judge you. I think the best blogs offer a little personal touch to keep it unique – readers want to get to know you, personally – but stay “on brand” when it comes to their content and artistic point of view.

3. Why do you write what you do?

Food preparation is one of the last pieces of artistic expression that I regularly practice. Being a grown up is so much more complicated and clouded – creating things with food is very simple and allows your brain to refocus and be peaceful. I’m always a happier, more balanced person when I have time to cook.

4. How does your writing process work?

Trial and error. I work within the normal limits of my life – food that is easy and affordable. The sad truth is that I often repeat recipes throughout the week for my family, so when it comes to blog-recipes, I sometimes have to be extremely creative and force myself to do something different. That challenge is what keeps life interesting.

Next up on the Blog Tour: Please visit the inspirational Teri at A Foodie Stays Fit – arguably one of the most popular blogs in the Triad.

20140727-150125-54085119.jpg

There’s not much to this post except a few ingredients that work together to create something elegant and robust with favors atypical for a regular weeknight meal.

My plan was simple. Smoked mozzarella was on sale. So were Cremini mushrooms. I try to keep store bought pizza crust on hand for those just-in-case moments. So I went to town …

Smoked Mozzarella and Truffled Mushroom Pizza

Ingredients

  • One ball of pizza dough (store bought or homemade)
  • 1 T unsalted butter
  • 6 oz of Cremini mushrooms (or more/less to taste and use your preference), sliced medium
  • 2 T garlic olive oil
  • 1 ball smoked mozz, sliced thin
  • Truffle oil (optional)
  • Coarse sea salt and black pepper

Preheat oven to 400 and lightly grease pizza sheet or baking sheet.

Heat butter over medium in large pan, then add mushrooms, sautéing until lightly browned around the edges, 5-7 min.

Roll or spread dough on prepared pan and brush with olive oil. Spoon mushrooms over top, then evenly distribute pieces of cheese.

Bake until crust is golden, crisp and cheese is melted, 10-15 min.

Out of the oven, drizzle pizza with truffle oil, salt and pepper. Slice. Serve with a peppery arugula salad.

Enjoy, friends! Xoxo

Tuscan Sausage With White Beans and Sage

Seasoned to Taste: Tuscan White Beans and Sausage

The more I look into pantry cooking and “peasant fare,” I find that the combination of beans and pork fat are a comforting mainstay across many cultures. From the purple-hull peas and ham hocks we make in The South to this simplified version of an Italian staple – pork sausage with white beans and tomatoes.

I altered the original recipe significantly, based solely on what I had on-hand. Canned beans instead of dried cannellini soaked overnight; one large, over-ripe fresh tomato instead of canned.

The one-pot dish creates a thick gravy as the beans cook and the starches swirl with white wine, hot garlic and melting bits of tomato. Simple and easy enough for a weeknight meal. I used pork sausage, but next time I will try chicken or turkey sausage, as we found the pork a bit rich.

Tuscan Sausage with White Beans and Sage

Ingredients:

  • 2 T EVOO
  • 5-6 sweet Italian sausages (1 package)
  • 4 garlic cloves, peeled and crushed
  • Pinch red pepper flakes
  • 1/4 c. crisp white wine (or to taste, depending on liquid level)
  • 1 can cannellini beans, with liquid
  • 1 large ripe tomato, or 1 can diced (drain a bit of the liquid if using canned)
  • 4 fresh sage leaves, sliced
  • S&P to taste

Heat oil in large skillet over medium. Brown sausages on all sides, 3-4 min. Add garlic and pepper flakes, continue to cook 1 min. Add wine and stir until bubbling. Add beans, tomato and sage, stirring to combine. Simmer 5 min, adding liquid as necessary so sausages are submerged 1/3 way, until sausages are cooked through. Uncover, simmer to thicken the sauce, if needed. Add salt and pepper to taste.

Seasoned to Taste - Tuscan Sausage and White Beans

I recommend serving with a crusty bread and simple green salad. And a glass of that white wine.

Seasoned to Taste - Tuscan Sausage and White Beans

Enjoy, friends! xoxo


Moroccan Chicken With Olives

20140713-092310-33790488.jpg

I have to give another shout-out to my gal-pal Bethany on this one, who posted about this “easy Moroccan week-night chicken dish.” I don’t know that I’d quite call it “easy” because it included about a dozen spices, but once you get the ingredients in, it’s pretty low-maintenance. And oh, how lovely those Moroccan flavors are – the red pepper, lemon and salty green olives. Warmth of cinnamon, heat of the ginger, perfume of coriander and that distinctive tinge of Spanish saffron.

All soaking through the tender, swollen pearls of Israeli couscous.

Like, Bethany, I used a fresh lemon instead of preserved (just couldn’t find it). We also had unpitted olives. Next time, I would like to remove the pits because it’s a bit of a bummer to have to bite around them.

Adapted from “My Fake Food Blog” and Food52

Moroccan Chicken with Green Olives

Ingredients:

  • 4 tablespoons canola oil
  • 2.5 pounds chicken thighs (I used bone-in, skin-on)
  • Kosher salt
  • Black pepper
  • 1 ½ cup small diced onion
  • 1 teaspoon minced ginger (I used ground, because didn’t have fresh)
  • 1 teaspoon minced garlic
  • 1 tablespoon ground coriander
  • 1 tablespoon ground cumin
  • 1 ½ teaspoon paprika
  • ½ teaspoon turmeric
  • ½ teaspoon cayenne pepper
  • 2 c. chicken stock
  • ¼ teaspoon saffron
  • ½ cup green olives, rinsed
  • 2 preserved lemons, pulp removed; rind cut into strips (or zest and juice of 1-2 lemons)
  • 2 tablespoons chopped cilantro

Heat 2 tablespoons of oil in a Dutch oven or large, deep skillet or over medium high heat. Dry the chicken pieces and season them with salt and pepper. Place them in the skillet in batches and brown on all sides. Make sure the skins are nice and crispy, like a pork rind. Remove the chicken and place on a plate.

Add the onion to the skillet and cook until slightly softened. Add the ginger, garlic, coriander, cumin, paprika, turmeric and cayenne pepper and stir together. Add the chicken pieces and stir to coat with the spice mixture. Pour the chicken stock into the skillet so that 2/3 of the chicken is submerged. Add the saffron and stir to combine. Bring liquid to a simmer, cover the skillet and simmer on medium low heat 20 minutes. Add the olives and lemons. Cover and cook another 10 minutes or until chicken is cooked through. Remove the chicken and turn the heat to high. Cook for another 6-8 minutes until sauce reduces slightly. Stir in the cilantro. Adjust seasoning to taste.

Serve chicken and sauce on a bed of couscous. Garnish with cilantro.

20140713-092413-33853665.jpg

Enjoy, friends! xoxo

Swiss Chard and Mushroom Galette with Whole Wheat Crust

20140430-143502.jpg

Swiss chard seems to be riding the popularity train with kale. Thick, slightly bitter, slightly tough greens that are hearty enough to weather the chilly months in your garden. They also happen to be very good for you, so my healthy friends say, which is why this recent Bon Appetit recipe appealed to me. Plus I loved the rustic look of it.

Savory galettes are a wonderful thing, don’t you think? I love the idea of folding pastry around something other than spiced apples or glossy peaches. It’s a bit of a mind trick (should this be sweet or salty?) and feels very French to eat pastry for dinner.

I went through the trouble of making the whole-wheat crust by hand, folding it to cup a mixture of sauteed mushrooms, chard, garlic and Swiss cheeses. The whole process reminded me what a bother it is cooking from scratch! Can’t believe I used to cook like this all the time, but I’ll stick with  my once-weekly cooking projects until I get my hands free.

I didn’t follow the original recipe exactly just because I forgot to buy ricotta cheese. And the new, frugal, time-saving me only goes grocery shopping one time per week. We enjoyed the nuttiness of the Swiss cheeses, so use your preference. I believe goat cheese would also be good, notably with the fresh lemon and grassy herbs.

Original Recipe:

Swiss Chard and Mushroom Galette

Ingredients:

WHOLE WHEAT DOUGH

  • 1 cup all-purpose flour
  • 1 cup whole wheat flour
  • 1 teaspoon kosher salt
  • ¾ cup (1½ sticks) chilled
  • unsalted butter, cut into pieces
  • 1 tablespoon apple cider vinegar

Pulse all-purpose flour, whole wheat flour, and salt in a food processor to combine. Add butter and pulse until mixture resembles coarse meal with a few pea-sized pieces of butter remaining. Drizzle with vinegar and ¼ cup ice water. Pulse just until a shaggy dough comes together; lightly knead until no dry spots remain (do not overwork). Pat into a disk and wrap in plastic. Chill at least 2 hours. (let sit at room temp for around 30 minutes to soften before rolling out)

GALETTE

  • 1 cup ricotta (or mix of 1 c. Swiss/Gruyere cheeses)
  • Kosher salt and freshly ground
  • black pepper
  • 3 tablespoons olive oil, divided
  • 1 package mushrooms, sliced, about 1 cup (I used baby bellas)
  • 1 garlic clove, finely chopped
  • 1 bunch large Swiss chard, ribs and stems removed, leaves cut into bite-size pieces (I bought Trader Joe’s pre-chopped bag of chard)
  • 1/4 fresh herbs (I used parsley and cilantro leaves)

Preheat oven to 400°. Season ricotta with kosher salt and pepper; set aside (skip this step if not using ricotta).

Heat 1 Tbsp. oil in a large skillet over medium-high heat. Add mushrooms; season with kosher salt and pepper and cook, stirring occasionally, until golden brown and crisp, about 5 minutes. Transfer to a small bowl.

Heat 1 Tbsp. oil in same skillet over medium heat. Cook garlic, stirring, until fragrant, about 30 seconds. Add half of chard, season with kosher salt and pepper, and cook, tossing, until slightly wilted. Add remaining chard and cook,
tossing occasionally, until completely wilted, about 4 minutes. Remove from heat; season with salt and pepper. Set aside.

Roll out dough on a lightly floured sheet of parchment to a 14” round about ⅛” thick. Transfer on parchment to a baking sheet. Spread three-fourths of cheese over dough, leaving a 1½” border. Top with reserved chard, then
mushrooms. Sprinkle remaining cheese over top. Bring edges of dough up and over filling, overlapping as needed, to create a 1½” border; brush with egg.

20140430-143556.jpg

Bake galette, rotating once, until crust is golden brown and cooked through, 35–40 minutes. Let cool slightly on baking sheet.

Sprinkle herbs over top, then zest and juice of lemon, cracked pepper and flaky sea salt.

20140430-143608.jpg

Slice, and enjoy, friends! xoxo

20140430-143649.jpg

Chicken with Morels and Creme Fraiche

Seasoned to Taste - Chicken with Morels

I think I will always see morels as tiny brains. But instead of grossing me out like they did as a child, they now represent for me something with a deep, earthy flavor and folds that hold all the creamy sauce you toss them in.

I also associate morels with the French movie “Amelie.” One of the characters mentions “hare and morels” … I’ve always wondered what exactly that meant.

This dish is one I look forward to making at a dinner party. Simple and elegant for the lowly chicken breast. Morels and creme fraiche are expensive, so this deserves a special occasion.

From Ina Garten.

Chicken with Morels and Creme Fraiche

Ingredients:

  • 1 package dried morels, soaked for 30 minutes in 3 cups very hot water
  • 3 boneless, skinless chicken breasts
  • Kosher salt
  • Freshly ground black pepper
  • All-purpose flour, for dredging
  • 1⁄4 cup melted butter
  • 1⁄4 cup chopped shallots (1 large)
  • 1 tablespoon minced garlic (3 cloves)
  • 1 cup white wine
  • 1 cup (8 ounces) creme fraiche
  • 1 cup heavy cream (optional)
  • 2 tablespoons freshly squeezed lemon juice

Preheat the oven to 375 degrees F.

Lift the morels carefully from the hot water in order to leave any grit behind in the liquid. Rinse a few times to be sure all the grittiness is gone. Discard the liquid and dry the morels lightly with paper towels. Set aside.

Seasoned to Taste - Chicken with Morels

Sprinkle the chicken breasts with salt and pepper. Dredge them in flour and shake off the excess. Heat half the butter in a large saute pan and cook the chicken in 2 batches over medium-low heat until browned on both sides, 8 to 10 minutes. Remove to an ovenproof casserole dish.

Add the rest of the butter to the pan along with the shallots, drained morels, and garlic. Saute over medium heat for 2 minutes, tossing and stirring constantly. Pour the wine into the pan and reduce the liquid by half over high heat, 2 to 4 minutes. Add the creme fraiche, cream (if using), lemon juice, 1 teaspoon salt, and 3⁄4 teaspoon pepper. Boil until the mixture starts to thicken, 5 to 10 minutes. Pour the sauce over the chicken and bake for 12 minutes, or until the chicken is heated through. To make ahead, refrigerate the chicken and sauce in the casserole and reheat slowly on top of the stove.

Served with rosemary Parmesan polenta.

Seasoned to Taste - Chicken with Morels

Enjoy, friends! xoxo


Kale Salad with Shaved Apple, Candied Almonds and Romano

20131231-084649.jpg

This kale salad has become a legend among my friends after a self-described non-foodie made it during a girls getaway trip. We all should have known that any gal who can whip up a Spam/Kraft Mac ‘n cheese dinner can also deliver a delicate and elegant salad made of only unprocessed ingredients.

Kale is all the rage these days, so you may be able to find shredded kale pre packaged at your local Food Lion equivalent. But it’s so much easier and cheaper, honestly, to do it yourself. Slice off the thick rib, roll the leaf into a cigar and then slice as thinly as you can.

Kale is a hearty, toothsome green that only works raw if shredded into ribbons and tossed with a tenderizing vinaigrette.

20131231-144242.jpg

Kale Salad With Apple and Candied Almonds

Ingredients
– 2 T extra virgin olive oil
– Zest and juice of 1 lemon
– 2 c. Thinly sliced kale, ribs removed
– 1/4 c shredded Pecorino Romano cheese
– 1/4 c chopped candied almonds (sauté whole almonds in a pat of butter and couple spoonfuls of brown sugar over medium heat until coated. Cool on wax paper)
– 1 crisp apple, thinly sliced
– pinch cayenne
– salt and pepper to taste

Whisk together oil, zest and juice in your salad bowl. Add seasonings to taste. Add apple slices and coat. Add kale, almonds and cheese. Toss to combine.

The almonds offer a crunch and candied sweetness to the tart apple and lemon mixture. The Pecorino Romano adds a nuttiness and thickens the dressing so it nicely coats the leaves. I like to shave big shards of cheese over the top for garnish.

I have made this for numerous dinner parties and thanks to the robust kale, it does well as a leftover, too.

Cheers, friends!

Brie and Apple Grilled Cheese with Bacon Jam

Seasoned to Taste - Brie and Apple Grilled Cheese with Bacon Jam

Hello, world!

The No. 1 fan of this blog – my mother – recently asked if I’m “still blogging” and “still on Twitter.” So sad when even your biggest fan is questioning your commitment.

Sadly, I’ve fallen off the blogging wagon but am newly committed to getting on again. The following factors have led to my vacation:

1. Selling old house/moving into new house…while 8 months pregnant.

2. HAVING A BABY

3. Computer stolen, with all my food photos on it.

4. Cookbooks still in boxes

5. HAVING A BABY

I’ve just started cooking again – a much different experience nowadays, but a fulfilling one.

So before everything changed, I made bacon jam. And I smeared it on some bread, topped it with brie and sliced apples and grilled it in butter. It was good. But let me tell you – I threw the rest of the bacon jam out after it sat…and sat…and sat in my fridge unused. I guess I just don’t know what else to do with bacon jam. And it was quite greasy … and I am not shy around grease.

Still, what a cool combination of rich, smoky flavors. I got the recipe from my DIY Cookbook. And since I don’t know where the cookbook is presently, here is where you can find it yourself: Recipe here.

Seasoned to Taste - Bacon Jam

See ya soon, friends! xoxo

Sriracha Quinoa Cakes with Goat Cheese and Spinach

Seasoned to Taste - Sriracha Quinoa Cakes with Feta and Spinach

Somehow, my move to The South triggered a new craving in my life: Hot sauces. I don’t know if it’s the over abundance of hot sauces in these parts (they are always placed on the table with the salt and pepper, regardless of your meal) or the increase in rich foods I’ve been eating (hot sauce cuts through the grease), but I can’t eat a bite of most savory meals without reaching for the Texas Pete’s or Sriracha.

Aside from offering an acidity to the dish and a bit of salt, there’s something about the taste of good hot sauce that amplifies all the other flavors. But you have to tread delicately, lest you overwhelm the dish.

This little recipe, adapted from We Are Not Martha, is built around Sriracha, so you don’t have to worry about it overpowering the other flavors. Instead, it offers a roasted heat to the crunchy quinoa cakes that are spotted with creamy bits of goat cheese and green spinach.

They were a fun little snack and would be good dipped in sour cream, I think. And the presence of quinoa just makes it feel healthy. Try them and let me know what you think!

Sriracha Quinoa Cakes with Goat Cheese and Spinach

Ingredients:

  • 2 C cooked quinoa
  • 3/4 C breadcrumbs (I used dried)
  • 2 cloves minced garlic
  • 1 C chopped baby spinach
  • 1/4 C Sriracha hot sauce
  • 2 oz. goat cheese, crumbled
  • 2 large eggs, whisked
  • 1/2 tsp fresh lime juice
  • Pinch salt
  • 1-2 T olive oil

In a large bowl, mix ingredients well. Form mixture into patties, 1-2 T each.

Drizzle EVOO in a nonstick skillet over medium heat. Add patties to skillet.
Cook patties until lightly browned on each side, about 5 min. per side. Add more oil as needed in between batches.

Seasoned to Taste - Sriracha Quinoa Cakes with Feta and Spinach

Then you’re done! Each with a squeeze of lime juice and a dollop of sour cream, if you wish.

Seasoned to Taste - Sriracha Quinoa Cakes with Feta and Spinach

Enjoy, friends! xoxo

Raspberry Breakfast Bars

Seasoned to Taste - Raspberry Breakfast Bars

I suppose you could say it’s *trying* to be spring. Trees are budding, pollen is falling, the daffodils are already past their prime, yet winter continues to noodle us with bouts of snow and freezing temps. Enough, already!

It’s not that I’m in any hurry to bring on the humidity, mosquitoes and dripping heat – it’s just that my bun in the oven is getting too big for any and all winter coats to effectively cover and I need to transition to my maxi skirts and wrap dresses STAT. Temperatures are expected into the 70s next week – here’s hoping!

This will be a season of major changes, but my wish is to continue to cook and blog as much as I can, to keep up on all the tasty memories. If you haven’t yet, be sure to follow me on Instagram (@asowa) for more live feeding.

Breakfast bars are a great way to believe you are eating healthy, but really they are just sugary, chewy, delicious pastries you may or may  not eat in the morning.

The combination of raspberries and oat crumble will remind you of all your favorite fruit pies: thick, bubbling syrup and toasted toppings. I baked these and ate them for a straight week, often multiples times per day. The corner pieces are my favorites because they are the most crunchy. Don’t be afraid to bake longer than it calls for if you like more solid crusts – the raspberries can make the crust soft in the middle.

One last piece of advise – keep the crust layer thick to again prevent a soggy bottom – mine was a little spare in patches, but it didn’t affect the flavor or my enjoyment of them.

Adapted from Smitten Kitchen (and her trip to North Carolina!).

Seasoned to Taste - Raspberry Breakfast Bars

Raspberry Breakfast Bars

Ingredients:

For the crust and crumb:

  • 1 1/2 cups all-purpose flour
  • 1 cup firmly packed dark brown sugar
  • 1 1/4 cups rolled oats
  • 3/4 teaspoon salt
  • 3/4 teaspoon baking powder
  • 1/2 teaspoon baking soda
  • 1/2 teaspoon cinnamon
  • 3/4 cup (1 1/2 sticks) unsalted butter, cut into 1-inch pieces

For the raspberry filling:

  • 1/4 cup firmly packed dark brown sugar
  • 1 tablespoon grated lemon zest
  • 1/2 teaspoon cinnamon
  • 2 tablespoons all-purpose flour
  • 1 pound raspberries, fresh or frozen (I used frozen – try other fruits, too! Peach, blackberry, blueberry…)
  • 1/4 cup fresh lemon juice
  • 2 tablespoons unsalted butter, melted and cooled

Make the crust and crumb: Preheat the oven to 350°F. Butter the bottom and sides of a 9-by-13-inch glass or light-colored metal baking pan. Put a long piece of parchment paper in the bottom of the pan, letting the parchment extend up the two short sides of the pan and overhang slightly on both ends for easy bar-removal. Butter the parchment or spray with cooking spray.

Put the flour, brown sugar, oats, salt, baking powder, baking soda, and cinnamon in a food processor. Pulse in short bursts until combined. Add the butter and pulse until loose crumbs form.

Reserve 1 1/2 cup of the mixture and set aside.  Pour the rest of the mixture into the prepared pan and use your hands to push the crust into an even layer at the bottom of the pan (note, you want it thick and packed hard). The crust should touch the sides of the pan. Bake until golden brown, 12 to 15 minutes (or longer, if necessary). Transfer to a wire rack and let the crust cool. Keep the oven on while you make the raspberry filling.

Make the raspberry filling: In a medium bowl, whisk the sugar, lemon zest, cinnamon and flour together. Add the raspberries, lemon juice and butter and toss gently until the raspberries are evenly coated.

Assemble and bake the bars: Spread the raspberry filling evenly on top of the cooled crust. Sprinkle the reserved crust mixture evenly on top of the filling.

Bake for 35 to 45 minutes, rotating the pan every 15 minutes, until the top is golden brown, firmed and the filling starts to bubble around the edges.

Transfer to a wire rack to cool completely, then cut into squares and serve. The bars can be stored in the refrigerator in an airtight container for up to two days – I found that the fridge kept them nice and firm and they lasted longer.

Seasoned to Taste - Raspberry Breakfast Bars

Enjoy, friends! xoxo