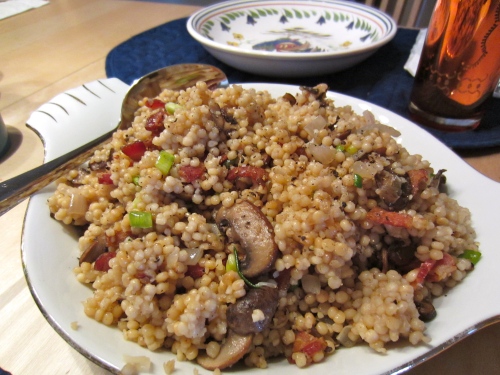
Truffled Israeli Couscous with Bacon

Seasoned to Taste - Truffled Israeli Couscous with Bacon and Mushrooms

Israeli couscous is like a better orzo – pearls of chewy starch that mix deliciously with both rich and light flavors – from citrus and herbs to bacon, mushrooms and leeks.

I have to admit that the only recipe I used was the liquid-to-couscous measurements on the back of the package, adding in my cooked mushrooms, bacon and onion at the end. What I’ve written below is my best recollection – please adjust to your pleasing.

And of course, truffle oil is optional. I received some as a birthday gift, so I’ve been drizzling it on everything. A simple olive oil or infused oil would be tasty, too. Just a little drizzle to make the couscous sparkle when serving.

Truffled Israeli Couscous with Bacon

Ingredients:

  • 2 T unsalted butter
  • 1 shallot, minced
  • 1 package or about 2 c. Israeli couscous
  • 4 c. chicken stock
  • 4 slices thick-cut bacon, chopped
  • 2 c. sliced mushrooms (I usually use cremini or shiitake)
  • 4 green onions, chopped
  • Salt and pepper to taste
  • Truffle oil, to taste, or olive oil

In medium sauce pan, heat 2 T olive oil over medium, then add shallot. When it starts to brown, add couscous and stir to coat in oil. When couscous begins to toast, 2-3 min, add chicken stock and pinch salt and pepper. Stir, bring to a boil, cover and reduce to a simmer for 10-12 min, until water is absorbed and couscous is tender but not mushy.

Meanwhile, heat medium skillet over medium-high and saute bacon until crispy. Remove bacon to paper towels to drain and add sliced mushrooms to bacon fat in skillet. Saute until nicely browned (they will release a lot of moisture), 7-8 min.

When couscous is done, fluff it with a fork, then add mushrooms, bacon, scallions and salt/pepper to taste. Transfer to serving platter and drizzle with truffle oil.

Seasoned to Taste - Truffled Israeli Couscous with Bacon and Mushrooms

Yum! It’s almost hearty enough for it’s own meal and the leftovers were my lunch the following day.

To actually make this a meal, I would serve the couscous over a bed of your favorite greens and place a soft-cooked egg on top, so you can break the yolk and let it spill over, creating a creamy sauce. Oh man, that sounds good!

When I made this, it was a side dish for some grilled sausages on toasted baguette with a chimichurri sauce:

Seasoned to Taste - Truffled Israeli Couscous with Bacon and Mushrooms

What a delightful way to spend a weekend day – just cooking and eating with friends who live within walking distance. I can’t tell you how important it is to live in a close-knit neighborhood, for these kind of spontaneous lunch or dinner parties.

Enjoy, friends, xoxo

Pistachio Pesto

Seasoned to Taste - Pistachio Pesto

What to do when you have a Costco-sized bag of toasted pistachio nuts…you sprinkle them on salads, chop to coat fish or meat, and you make pesto.

Normally, I wouldn’t consider pesto without basil. It just seems wrong, like using walnuts instead of pine nuts. But basil isn’t exactly in season during the winter, so I took a chance with what I had on hand: parsley, Parmesan, garlic and tons of pistachios. What developed was a unique combination of flavors that I can’t wait to make again.

Without something strongly floral like basil, you have to rely on the nuts to provide the bulk of the pesto, which produces a thicker sauce than you might be used to. Pistachios (the roasted kind) are also drier, less fatty, so aren’t quite as creamy when pureed.

I love the dark greenish-brownish hue the pesto takes on …

Easy Pistachio Pesto

Ingredients:

  • 2 c. roasted shelled pistachio nuts (mine were salted)
  • 1/2 c. shredded Parmesan cheese
  • 3 garlic cloves, chopped
  • Handful fresh parsley, roughly chopped
  • Salt and pepper to taste
  • Extra virgin olive oil

In food processor, pulse the nuts, cheese, garlic and parsley. With motor running, drizzle in olive oil until you reach your desired consistency – probably 1/3 – 1/2 c. for me. Taste for seasonings and add salt and pepper. If you used salted nuts, you won’t need as much salt.

Seasoned to Taste - Pistachio Pesto

This will probably keep a couple weeks in the fridge, but I wouldn’t know because mine didn’t last that long!

I immediately used my batch with some angel hair pasta and fresh tomatoes, which was a delicious and light dinner. Later, I used the leftover pesto in many ways: stirred into couscous, spread onto a sandwich and mixed with ricotta for an upcoming lasagna this week.

Here’s a crude snapshot of my pistachio pesto pasta leftovers, ready to go to work:

Seasoned to Taste - Pistachio Pesto

Enjoy, friends!

Almond Butter with Sea Salt

Seasoned to Taste - Almond Butter with Sea Salt

My mom got me this awesome cookbook from America’s Test Kitchens –  the DIY Cookbook, showing you how to make everything from your own Sriracha to Worcestershire sauce to candied ginger. I will soon be trying the bacon jam recipe, but before that I went for the almond butter, because I had been wanting to try making its sibling, peanut butter.

For something so expensive in the grocery store, the two-ingredient, two-step recipe seemed unbelievable. I guess I just assumed you added oil or sugar or SOMETHING else to get that great spreadable consistency.

On the contrary, all you need is nuts and salt, and the process of grinding the almonds  pulls all those rich oils out and blends the pieces into a smooth butter that sticks to the roof of your mouth. I added more salt than the recipe’s 1 teaspoon, because I liked the flakes of sea salt breaking through the rich butter. Bigger salt crystals always hit your tongue after a few chews, so they don’t overpower.

I have tested this recipe once, but feel it will be emerging again around the holidays – it’s a wonderful hostess gift or present, as it stores well and will impress your friends. I have consumed and given enough away that I already wish I had made a double batch.

Almond Butter with Sea Salt

Ingredients (makes 2 c.):

  • 4 c. almonds, whole
  • sea salt

Heat oven to 375. Spread almonds evenly on baking sheet and roast on middle rack until slightly darkened, 10-12 min. Let cool until just warm, 20 min.

Add almonds to food processor and blend, scraping down sides to help it along, about 7-10 min. total. Puree until the oils release and it becomes the consistency of peanut butter. Add 1 tsp salt and process. Taste for seasonings. Add more salt if you prefer.

I was concerned multiple times that mine was not coming together – you feel like you are grinding and grinding and it’s just a mess of crumbs. So I kept mixing the puree from the bottom to the top to distribute the pieces, and processed until finally, it started to become smooth. And became this:

Seasoned to Taste - Almond Butter with Sea Salt

Transfer to jars with tight lids. The almond butter can be stored in fridge for up to 2 months.

I have been snacking on crisp Gala apples dipped in my almond butter – just how I used to eat peanut butter as a child. It’s wonderful and such a healthy, filling snack for work.

Seasoned to Taste - Almond Butter with Sea Salt

Enjoy, friends! xoxo

Split Pea Soup with Virginia Ham

Seasoned to Taste - Split Pea Soup with Virginia Ham

Grant and I are spending the day “de-cluttering” – cleaning out closets, making trips to the dump and painting the stairwell. While it is sunny and mild in our neck of North Carolina today, I hear our friends to the north are getting quite the snow storm that is keeping folks homebound.

Thick soups are perfect for those surprise snowy days, when all you want to hear is the hiss of your radiator and blips of soup bubbles working on the stove. I made this soup in an effort to use some leftover smoked Virginia ham … and try out the new immersion blender that my mom gave me! So excited. And it was splendid.

This recipe is from Cooking Light, but I added the meat – seems wrong to have split pea soup without some sort of ham. While I didn’t use a ham hock as is traditional, I think the Virginia ham offered a comparable flavor with plenty of meat (something a ham hock lacks).

I have reduced the amount of rosemary because I found it overpowering – add more if you love it.

Split Pea Soup with Virginia Ham

Ingredients:

  • 1 1/2 c. dried split peas
  • 2 tsp olive oil, divided
  • 2 c. chopped onion (one large, I used sweet onion)
  • 1 c. diced carrot
  • 1 bay leaf
  • 1 T minced garlic cloves
  • 2 tsp minced fresh rosemary
  • 1 tsp paprika
  • 1/4 tsp black pepper
  • 1 T tomato paste
  • 1 T soy sauce (for salt)
  • 4 c. water or chicken stock
  • 1/4 c. chopped parsley
  • 1 pound diced smoked ham (or substitute)

Wash beans. Cover with water and set aside.

Heat 1 tsp oil in Dutch oven over medium high heat. Add onion, carrot and bay leaf, saute 5 min. Add garlic, rosemary, paprika and pepper, stirring, and cook 3 min. Add tomato paste and soy sauce; cook until liquid evaporates, scraping bottom of the pan to deglaze.

Drain peas. Add peas to Dutch oven, along with water/stock. Bring to a boil, adding another cup of water if needed to thin it. Cover, reduce heat to medium low and simmer 1 hour, stirring often. Discard bay leaf. Using a food processor or immersion blender, blend soup until pureed to your desired consistency – I didn’t want baby food.

Return Dutch oven to medium heat and add ham to warm through. Taste for seasonings.

To serve, spoon soup into big bowls and finish with a grating of Parm cheese and a drizzle of good olive oil.

Seasoned to Taste - Split Pea Soup with Virginia Ham

Goes very well with crusty bread and a simple oil-vinegar salad.

Enjoy, friends! xoxo

Chicken with Almond-Garlic Saffron Sauce

Seasoned to Taste - Chicken with Saffron Almond Sauce

Saffron is an unusual flavor that I’m not totally sure about. On one hand, I associate it with delicious Spanish dishes like paella, but on the other hand, it has a strange essence. The turmeric color it releases is beautiful, but that earthy flavor easily overwhelms my palette, so I have to be careful how I use it.

This Spanish-inspired dish uses saffron along with a bunch of garlic and almonds to create a rich, creamy sauce served with chicken. It is quite similar to a curry, so I am calling it Spanish Chicken Curry. The almonds puree with fresh bread crumbs to thicken the sauce without the aid of dairy products. I love that trick.

While I only used a small pinch of saffron threads (get these at Trader Joe’s – way cheaper!), I still found the flavor a bit strong. Grant loved it and ate all the leftovers, so perhaps the problem lies with my pickiness. My senses have been much more acute lately…

I made this with an easy rice side – simply cooking a little tomato in oil in your rice pot, then stirring in the uncooked rice and proceeding as normal. The tomato broke down into a nice light-red tinge gently coating the rice, providing a sweet bed for my chicken and sauce.

This recipe has a few steps, but the sauce can be made in advance and simply added in where the recipe calls for it. Note that I used boneless skinless chicken because it’s just so much easier to eat!

Adapted from Bon Appeit:

Chicken with Almond-Garlic Saffron Sauce

Ingredients:

  • 4 tablespoons olive oil, divided
  • 1/2 cup slivered almonds
  • 2 cups 1/2-inch cubes crustless white bread
  • 4 garlic cloves
  • 2 cups low-sodium chicken broth
  • 2/3 cup dry Sherry or white wine
  • 1/2 teaspoon freshly ground black pepper plus more for seasoning
  • 1/2 teaspoon saffron threads
  • Kosher salt
  • 4 chicken legs (I used 4 boneless, skinless chicken breasts)
  • 1 onion, minced
  • 1 tablespoon chopped flat-leaf parsley

Method:

  • Heat 3 Tbsp. olive oil in a large heavy pot over medium heat. Add almonds and stir until golden brown, about 3 minutes; transfer to paper towels. Place 1/3 cup almonds in a blender or food processor. Set aside remaining almonds for garnish.
  • Add bread cubes and garlic to same pot. Cook, stirring frequently, until bread is golden brown and crisp, 4–5 minutes. Using a slotted spoon, transfer to blender. Add broth, wine, 1/2 tsp. pepper, saffron, and a large pinch of salt; process until almost smooth. Set aside.
  • Heat remaining 1 Tbsp. olive oil in same pot over medium-high heat. Season chicken with salt and pepper. Add to pot and cook, turning down heat if needed to prevent burning, until chicken is golden brown on all sides, about 12 minutes. Transfer chicken to a plate.
  • Add onion to pot; cook, stirring often, until onion is caramelized around edges, about 6 minutes. Add sauce and chicken to pot, pushing down chicken to submerge. Bring sauce to a simmer, cover, and reduce heat to low. Simmer until chicken is just cooked through, approx. 10 minutes for me, but depends on the thickness of your chicken. Bone-in chicken will take 20 min. Season to taste with salt and pepper.
  • Divide chicken and sauce among bowls. Garnish each serving with reserved almonds and chopped parsley.

Seasoned to Taste - Chicken with Almond Saffron Sauce

Enjoy, friends! xoxo

Sweet Potato Biscuits

Seasoned to Taste - Sweet Potato Biscuits

Happy Birthday to me! As has become tradition, I celebrated my birthday ( and entry into a new decade) this month with a Birthday Brunch for a bunch of girlfriends. I give guests a strictly enforced dress code (cute; on-trend; Instagram-ready) and expectations for a filling morning of heavy snacks and cool drinks.

Two must-haves for any party: fresh flowers and lots of candles. I bought a pretty bouquet from Trader Joe’s, which I split apart and used to fill a dozen white milk glass vases around the house. Many of my wedding gifts came out as I needed all the platters and serving dishes I could find: Fresh fruit salad with limoncello, phyllo-baked brie with almonds and apricots, curried chicken strudels, soppressata and Gruyere puffs, edamame hummus, lox with cream cheese and capers, salsa fresca, guacamole and the centerpiece: mango-ginger glazed ham sliders with cheddar & chive biscuits and sweet potato biscuits. Check my Instagram feed (@thewritegal) for more pics.

Finding a smoked spiral-sliced ham proved difficult in this holiday off-season, but I won’t bore you with the details. The net result is I got my ham, and now have plenty for leftovers (split-pea soup with ham is simmering on the stove as we speak!)

The cheddar and chive biscuits will be featured on a future post, but I want to highlight these sweet potato biscuits, the recipe for which my friend and neighbor Molly gave me. It’s a simple biscuit recipe with cooked sweet potatoes providing much of the “wet” ingredients. I served the biscuits with Dijon mustard and a sweet cinnamon butter that I whipped up. My favorite combination was the sweet potato biscuit with cinnamon butter and smoked ham. Yum!

These are an obvious choice for brunch, or really any breakfast. I love the sweet biscuits with the salty/smoky ham. They are also good alone, with honey butter or cinnamon butter.

Seasoned to Taste - Sweet Potato Biscuits

Thanks for the recipe, Molly!

Sweet Potato Biscuits

Ingredients:

  • 2 cups flour
  • Heaping 1/2 tsp salt
  • 3 1/4 tsp baking powder
  • 1 tsp sugar
  • 5 tbsp chilled shortening
  • 1/2 – 1 cup thoroughly mashed, riced, or pureed cold, cooked sweet potato (two medium sweet potatoes for me, which I cooked in the microwave and scooped out)

Preheat oven to 500.

Mix dry ingredients together in a bowl. Add in the shortening, cutting it into the dry ingredients with a pastry blender or your fingers. Add in your mashed sweet potato and just enough cold milk to get the dough to the right consistency (mine was roughly 1/4-1/2 c. milk). Turn the dough onto a lightly floured surface and knead lightly, about 10 strokes. Roll out dough to about 1/2 – 3/4 inch thick. Cut into rounds and place on parchment-lined cookie sheet.

Bake for approximately 8 minutes, until golden. The dough can get very heavy when re-rolled, so work scraps as little as possible.

Once baked, slice in half with a serrated knife if you are making sliders.

Best served warm, or cool completely and store in air-tight container.

Season to Taste - Sweet Potato Biscuits

Enjoy, friends! xoxo

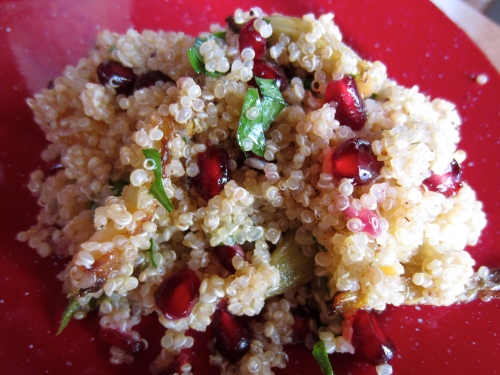
Quinoa Salad with Fennel and Pomegranate

Seasoned to Taste - Quinoa Salad with Fennel and Pomegranate

I never notice pomegranates until they are gone. They appear in the grocery stores – usually on sale 2/$5 – for a couple months through the fall and winter, and then disappear the rest of the year. I wonder how I can get tomatoes all year round, but pomegranates only during select months? My point is that I save all these pomegranate recipes, forgetting to make them when I can find the fruits in season.

This recipe is very unique tasting. The pomegranate is sweet but very tart, adding a different flavor profile along with the nutty anise of the fennel and the citrus with herbs. It was fresh and had a bite, but will definitely make you stop and think, “Huh?” after the first bite. I think it’s the pomegranate seeds, which literally explode when you chew them.

Adapted from Bon Appetit:

Quinoa Salad with Fennel and Pomegranate

Ingredients:

  • 1/4 cup plus 1 tablespoon olive oil
  • 2 medium fennel bulbs (2 1/2 pounds), cut lengthwise into 1/4″-thick slices
  • Kosher salt and freshly ground black pepper
  • 2 tablespoons fresh lemon juice
  • 1 1/2 teaspoons ground cumin
  • 1 teaspoon sugar
  • 1 cup quinoa, rinsed
  • 1 lemon
  • 1 serrano chile, seeded, chopped (I omitted and just used a pinch red pepper flakes)
  • 1/2 cup chopped fresh cilantro (I only had parsley – totally different)
  • 1/2 cup chopped fresh mint (didn’t use)
  • 1 teaspoon chopped fresh dill (hate dill)
  • 1/4 cup pomegranate seeds (from 1/2 small pomegranate)
  1. Heat 1/4 cup oil in a large skillet over medium heat. Add fennel; season with salt and pepper. Cook, stirring occasionally, until fennel is just tender and lightly golden, 10–12 minutes. Stir in lemon juice, cumin, and sugar; cook for 1 minute. Season with salt and pepper. Set aside.
  2. Meanwhile, bring quinoa and 3 cups water to a boil in a medium saucepan. Cover, reduce heat to low, and simmer until quinoa is cooked, about 10 minutes. Drain; return to pan. Cover; let sit for 15 minutes. Fluff with a fork; transfer to a large bowl.
  3. Using a small sharp knife, cut all peel and white pith from lemon (an orange is good here, too). Cut between membranes to release segments; discard membranes and roughly chop. Add lemon with any juices and remaining 1 Tbsp. oil to quinoa; stir. Add fennel mixture, chile, and herbs. Toss gently to incorporate. Season with salt and pepper. Transfer salad to a platter; sprinkle with pomegranate seeds.

Seasoned to Taste - Quinoa Salad with Fennel and Pomegranate

We had this with some vegetarian tacos that a friend (Teri from A Foodie Stays Fit) made – it was a healthy little lunch!
Seasoned to Taste - Quinoa Salad with Fennel and Pomegranate

Enjoy, friends! xoxo

Strawberry Yum Yum Pie

Seasoned to Taste - Strawberry Yum Yum Pie

One thing to love about The South’s culinary history is the abundance of old-timey cookbooks and recipes. Collections of church-ladies’ hand-written cards complete with illustrations, Junior League “receipts” full of whiskey and gelatin, and faded, stained scraps of paper hidden inside cupboards or messy drawers. If the author of “Julie & Julia” had worked her way through a Southern church cookbook, I would have been way more impressed than Julia Child’s novel of a cookbook. Because these old recipes are crafted off generations of memory, without exact science and a good deal of guesswork on the part of the reader.

For example, “Add enough milk” and “Add dessertspoon butter” And “Sprinkle with xxxx sugar.” Part of the fun is guessing, or calling your Southern mother/grandmother/friend to help translate.

For Christmas, one of Grant’s sisters gave everybody a copy of an old family recipe from Ms. Nell Bennett, “Granny’s Strawberry Yum Yum Pie.” Description: “This is an old fashion way of making fruit pies (or cobblers). My! What flavor the juice in this pie has.”

And so it does.

Seasoned to Taste - Strawberry Yum Yum Pie

I made this for a small crowd recently, all who loved the cakey batter made soft with strawberry juices and caramelized bits around the edges. I probably took the baking a bit too far, but the recipe wasn’t exact – I shall learn next time.

Strawberry Yum Yum Pie

Ingredients (I altered for the modern reader):

  • 1 1/2 c. all-purpose flour
  • 2 T cold shortening
  • 1 tsp kosher salt
  • 1 c. sugar
  • 2 tsp baking powder
  • milk (I probably used 1/2 c.)
  • 2 c. sliced strawberries
  • 2 T cold diced unsalted butter
  • 2 T sugar

Mix flour, salt, sugar and baking powder in a large bowl. Cut in the shortening to resemble coarse meal. “Add enough milk to make a soft batter” = use a wooden spoon to stir in up to 3/4 c. milk (I used whole milk), until it comes together like a cake batter. Pour into baking dish. Sprinkle strawberries evenly over, then cover with 2 T sugar. Dot with butter.

Bake at 400 about 25 minutes, increasing the heat to 450 to brown the top, if needed, for the last 10 minutes. The batter rises to the top and forms a nice crust around the strawberries. Again, I let mine brown a little too far, but no matter.

Seasoned to Taste - Strawberry Yum Yum Pie

Set aside to cool to your liking, then scoop onto plates.

Seasoned to Taste - Strawberry Yum Yum Pie

It is wonderful at room temperature or even cold, but is so easy to warm up, which people seem to prefer. Would be fabulous with some vanilla ice cream or whipped cream on top.

Seasoned to Taste - Strawberry Yum Yum Pie

Enjoy, friends! xoxo

Jalapeno Cheddar Cheese Crackers

Seasoned to Taste - Jalapeno and Cheddar Cheese Crackers

The older I get, the more I lean toward savory snacks and treats during the holidays. They seem a welcome reprieve after all of the sweets and sugary drinks. One thing that has become my standby for get-togethers and easy hostess gifts is savory cookies. Next year for Christmas, I will just make a medley of these shortbread crackers/cookies as gifts because they are always popular on table spreads.

Ina Garten first introduced me to her blue cheese and walnut shortbread crackers, which turned me on to savory pastry cooking.

Recently, I saw her prepare these on The Today Show (a recipe from her new cookbook, which of course I own) and knew I had to make them. Not unlike the cheese coins or cheese straws we see everywhere in The South, Ina’s Jalapeno Cheddar Cheese Crackers combine sharp cheddar cheese with fresh jalapeno, smoked chipotle chili powder and crunchy fleur de sel on top.

Addictive, the crackers go perfectly with a cold beer.

I make the dough a day ahead and then just slice and bake before I need them.

As seen on The Today Show

Jalapeno Cheddar Cheese Crackers

Ingredients (makes about 34 crackers):

  • 2 cups all-purpose flour
  • 1 teaspoon kosher salt
  • ¹⁄8 teaspoon baking powder
  • 14 tablespoons (13/4 sticks) cold unsalted butter, 1/2-inch-diced
  • 5 ounces extra-sharp white cheddar, grated
  • 1 tablespoon minced seeded jalapeño pepper
  • 1/4 teaspoon chipotle chili powder
  • 3 tablespoons ice water
  • 1 egg beaten with 1 tablespoon milk, for egg wash
  • Fleur de sel or sea salt

Place the flour, kosher salt, and baking powder in a food processor fitted with the steel blade and pulse to mix. Add the butter and pulse until the mixture resembles coarse meal. Add the cheddar, jalapeño, and chipotle chili powder and pulse again. With the food processor running, add the ice water all at once. Continue pulsing until the mixture begins to form a ball. Dump the dough onto a floured board and roll it into a 14-inch log. Wrap in plastic, and refrigerate for at least 1 hour.

When ready to bake, preheat the oven to 400 degrees F. Line a sheet pan with parchment paper.

Cut the dough in 3/8-inch-thick slices. Place the crackers on the prepared sheet pan, brush with the egg wash, and sprinkle with the fleur de sel. Bake for 12 to 15 minutes, until golden brown (Note: mine took about 18 minutes). Serve slightly warm or at room temperature. If serving later, cool completely then store in airtight containers.

Seasoned to Taste - Jalapeno and Cheddar Cheese Crackers

Can you see the bits of jalapeno in there? So pretty and festive!

Seasoned to Taste - Jalapeno and Cheddar Cheese Crackers

Enjoy, friends! xoxo

Crock Pot Spicy Thai Peanut Pork

It just occurred to me that all of my Crock Pot dishes look the same. Especially the Asian ones – braised meat, thick sauces and topped with my favorite type of onion: green onions! This dish adds another layer of flavor with peanut butter, a rich and creamy finish to a deeply flavored meat.

Unlike many pork Crock Pot meals, this one uses the lean pork tenderloin, resulting in a much less greasy dish.

Warm and comforting on chilly nights like these, this meal is easy to put on in the morning while you do you last-minute holiday shopping (and other merriment).

I love how bits turn dark and extra caramelized in the slow cooker. Deeply satisfying and comforting to every one of your senses.

Adapted from Cooking Light.

Crock Pot Spicy Thai Peanut Pork

Ingredients (serves 3-4):

  • 2 lb. boneless pork tenderloin, cut into 4 pieces
  • 1/4 c. teriyaki sauce (I didn’t have this, so just mixed up some oyster sauce, ground ginger, soy sauce and brown sugar)
  • 2 T rice wine vinegar
  • 1 tsp crushed red pepper flakes
  • 2 garlic cloves, minced
  • 1/4 c. creamy peanut butter
  • Cooked rice
  • Sliced green onions, for garnish
  • Lime wedges, for garnish

Place pork in slow cooker. Stir teriyaki, vinegar, pepper flakes and garlic cloves in small bowl and pour over pork. Cover and cook on low for 8 hours. (Note: if you want more juice, I would add some chicken stock to the mix – next time I will add at least 1-2 cups of stock along with the spices).

When cooked, remove pork and coarsely chop. Whisk peanut butter into slow cooker to combine. Stir in pork.

Serve over cooked rice, with green onions on top. Squeeze lime over to serve – the lime juice is a nice balance to the richness of the dish, so I highly recommend it.

Enjoy, friends! xoxo