Tag Archives: tomatoes

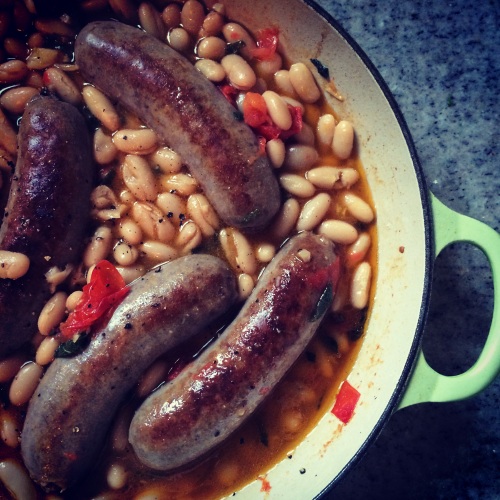
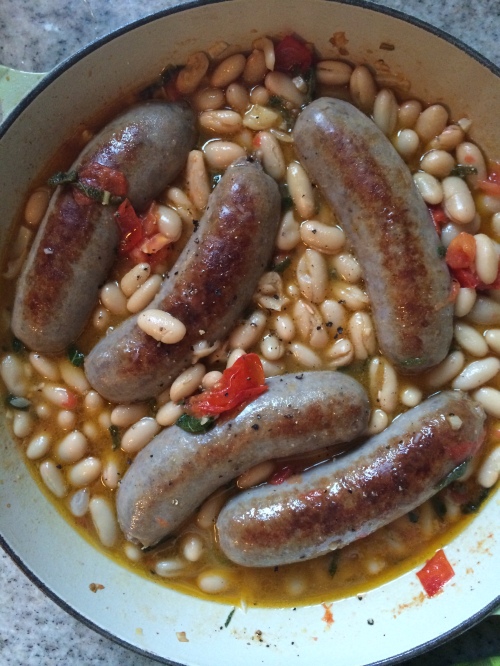
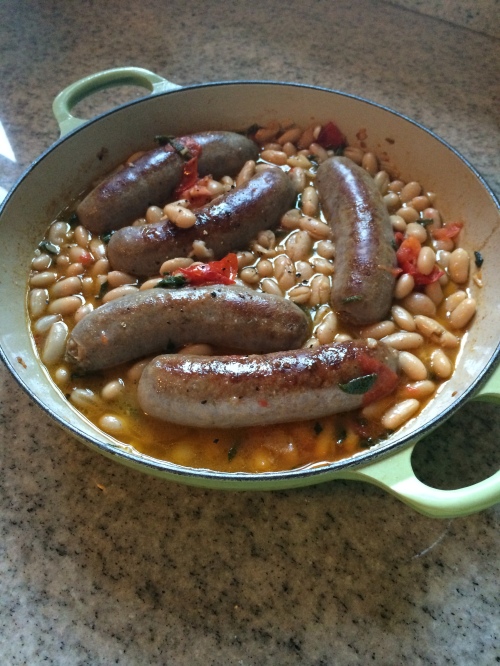
Tuscan Sausage With White Beans and Sage

Seasoned to Taste: Tuscan White Beans and Sausage

The more I look into pantry cooking and “peasant fare,” I find that the combination of beans and pork fat are a comforting mainstay across many cultures. From the purple-hull peas and ham hocks we make in The South to this simplified version of an Italian staple – pork sausage with white beans and tomatoes.

I altered the original recipe significantly, based solely on what I had on-hand. Canned beans instead of dried cannellini soaked overnight; one large, over-ripe fresh tomato instead of canned.

The one-pot dish creates a thick gravy as the beans cook and the starches swirl with white wine, hot garlic and melting bits of tomato. Simple and easy enough for a weeknight meal. I used pork sausage, but next time I will try chicken or turkey sausage, as we found the pork a bit rich.

Tuscan Sausage with White Beans and Sage

Ingredients:

  • 2 T EVOO
  • 5-6 sweet Italian sausages (1 package)
  • 4 garlic cloves, peeled and crushed
  • Pinch red pepper flakes
  • 1/4 c. crisp white wine (or to taste, depending on liquid level)
  • 1 can cannellini beans, with liquid
  • 1 large ripe tomato, or 1 can diced (drain a bit of the liquid if using canned)
  • 4 fresh sage leaves, sliced
  • S&P to taste

Heat oil in large skillet over medium. Brown sausages on all sides, 3-4 min. Add garlic and pepper flakes, continue to cook 1 min. Add wine and stir until bubbling. Add beans, tomato and sage, stirring to combine. Simmer 5 min, adding liquid as necessary so sausages are submerged 1/3 way, until sausages are cooked through. Uncover, simmer to thicken the sauce, if needed. Add salt and pepper to taste.

Seasoned to Taste - Tuscan Sausage and White Beans

I recommend serving with a crusty bread and simple green salad. And a glass of that white wine.

Seasoned to Taste - Tuscan Sausage and White Beans

Enjoy, friends! xoxo


Pistachio Pesto

Seasoned to Taste - Pistachio Pesto

What to do when you have a Costco-sized bag of toasted pistachio nuts…you sprinkle them on salads, chop to coat fish or meat, and you make pesto.

Normally, I wouldn’t consider pesto without basil. It just seems wrong, like using walnuts instead of pine nuts. But basil isn’t exactly in season during the winter, so I took a chance with what I had on hand: parsley, Parmesan, garlic and tons of pistachios. What developed was a unique combination of flavors that I can’t wait to make again.

Without something strongly floral like basil, you have to rely on the nuts to provide the bulk of the pesto, which produces a thicker sauce than you might be used to. Pistachios (the roasted kind) are also drier, less fatty, so aren’t quite as creamy when pureed.

I love the dark greenish-brownish hue the pesto takes on …

Easy Pistachio Pesto

Ingredients:

  • 2 c. roasted shelled pistachio nuts (mine were salted)
  • 1/2 c. shredded Parmesan cheese
  • 3 garlic cloves, chopped
  • Handful fresh parsley, roughly chopped
  • Salt and pepper to taste
  • Extra virgin olive oil

In food processor, pulse the nuts, cheese, garlic and parsley. With motor running, drizzle in olive oil until you reach your desired consistency – probably 1/3 – 1/2 c. for me. Taste for seasonings and add salt and pepper. If you used salted nuts, you won’t need as much salt.

Seasoned to Taste - Pistachio Pesto

This will probably keep a couple weeks in the fridge, but I wouldn’t know because mine didn’t last that long!

I immediately used my batch with some angel hair pasta and fresh tomatoes, which was a delicious and light dinner. Later, I used the leftover pesto in many ways: stirred into couscous, spread onto a sandwich and mixed with ricotta for an upcoming lasagna this week.

Here’s a crude snapshot of my pistachio pesto pasta leftovers, ready to go to work:

Seasoned to Taste - Pistachio Pesto

Enjoy, friends!

Tabbouleh

One wedding-related detail I hadn’t anticipated is the stress of hosting out-of-town guests. Honestly, it has probably troubled me more than the big event – keeping the cat-hair level down, vacuuming the rugs every day, tidying the bathrooms, etc. And feeding all the extra mouths around.

To minimize my stress, I’ve been relying on easy one-off dishes that can be snacks or meals, depending on the person. That way, I can feed someone who just landed from a 5-hour flight, someone who just stopped by for a snack or someone who wants a light meal.

Salmon and lox are great; so is brie cheese with an assortment of crackers and jellies. I recently made tabbouleh salad for some house guests and it is the perfect, healthy and flavorful salad to make and just keep in the fridge – it only gets better with time!

I used to think tabbouleh was gross hippie food, but now I find it to be a wonderful cool, crunchy salad for spring and summer. Grant asks for it literally all the time.

Adapted from Ina Garten (she uses way too much salt in this!)

Tabbouleh

Ingredients:

  • 1 cup bulghur wheat
  • 1 1/2 cups boiling water
  • 1/4 cup freshly squeezed lemon juice (2 lemons)
  • 1/4 cup good olive oil
  • 1 1/2 teaspoons kosher salt
  • 1 cup minced scallions, white and green parts (1 bunch)
  • 2 T chopped fresh mint leaves
  • 3 T chopped flat-leaf parsley
  • 3 T chopped fresh basil
  • 1 cucumber, peeled, seeded, and medium-diced
  • 2 cups cherry tomatoes, cut in half
  • 1 teaspoon freshly ground black pepper

Place the bulghur in a large bowl, pour in the boiling water, and add the lemon juice, olive oil, and 1 1/2 teaspoons salt. Stir, then allow to stand at room temperature for about 1 hour.

Add the scallions, mint, parsley, basil, cucumber, tomatoes, salt and the pepper to taste; mix well. Serve or cover and refrigerate.

I sprinkle a little extra sea salt over the top to finish. Scrumptious. This is definitely my new potluck go-to dish.

This will be last blog post before my wedding, and in case you miss me, here’s a picture from my bachelorette party/wine tour (which was perfect for me because it included a wine-branch wreath-making party!). I don’t know where my friend Caitlin found these Mickey Mouse ears, but I wore them with pride.

See you soon, friends! xoxo

Bacon-Fried Green Tomato Sandwich

There comes a time in every food blogger’s life when she  makes something so devilishly delicious that she simply must post about it, even if the photos are terrible.

Green tomatoes are easy to find around this time of year, as farmers wait for that first frost to pull down the plants.

Having lived in The South for a couple years, I’m already over fried-green tomatoes. Everybody makes them and puts them on salads or between bread or as a game-day appetizer. But then I saw someone write about skipping the sweet cornmeal batter and frying them in bacon grease! It is so much easier this way.

Here I give you bacon-fried green tomatoes that I turned into a fabulous BLT and then took bad, no-natural-light photos of.

Bacon-Fried Green Tomato Sandwich

Ingredients (serves 2)

  • 2 small green tomatoes, sliced
  • 4 slices of sourdough bread, buttered on one side
  • 4 slices of thick-cut bacon
  • Lettuce or salad mix
  • Mayo (I mixed mine with a little pesto – a must!)
  • Salt and pepper

In a large skillet, fry up the bacon until crisp. Set aside to drain on paper towels. Pour off all but 1-2 T of the bacon grease and return pan to heat. Add green tomato slices and fry until browned on each side and slightly softened, 4-5 min. per side. Remove to drain.

Assemble sandwiches. Preheat broiler and toast your bread. On non-buttered side, spread 1-2 tsp mayo, then layer lettuce, bacon and tomato. Sprinkle a little salt and pepper over the tomatoes. Place the other piece of toast on top, then slice in  half.

Then DIG IN! Too good to be true.

Enjoy, friends! xoxo

Ciabatta Bread

Well hello again, you! Please excuse my sporadic summer blogging – what with my vacation schedule and work rolling into the busiest months, it has been difficult for me to cook, let alone blog. But here is something I baked and took on a mini-vacation for a delicious appetizer snack.

I’m no bread maker. And while this recipe turned out tasting great, especially with the toppings described later, it wasn’t as good as I wanted it to be. I’m blaming that on the fact that I didn’t have a spritzer for spritzing water on the bread every few minutes, as suggested. Psh, who has time for that kind of babysitting?

Here is my Cook’s Illustrated recipe for chewy ciabatta bread:

Ciabatta

Ingredients – sponge

  • 1 c. AP flour
  • 1/8 tsp instant (rapid-rise) yeast
  • 1/2 c. room-temp water

Ingredients – dough

  • 2 c. AP flour, plus more for dusting
  • 1 1/2 tsp table salt
  • 1/2 tsp instant yeast
  • 3/4 c. room-temp water
  • 1/4 c. room-temp milk (I used whole milk)

Combine sponge ingredients in medium bowl and stir until a uniform mass forms, 1 min. Cover tightly with plastic wrap and let stand at room temperature for at least 8 hours (overnight).

Place sponge and dough ingredients in stand mixer bowl fitted with paddle attachment. Mix on low until roughly combined, about 1 min. Scrape down sides. Increase speed to medium-low and continue mixing until dough becomes uniform mass that collects on the paddle, 4-6 min (note: I added at least another 1/2 c. of flour because mine was still too wet). Change to dough hook and knead bread on medium until smooth and shiny, very sticky, about 10 min. Transfer to large bowl and cover tightly with plastic wrap. Let rise at room temp until doubled in size, 1 hr.

Spray rubber spatula with cooking spray and fold dough over on itself from the edges inward at 90-degree turns – do it a total of 8 turns around the edges. Cover again and let rise 30 min. Repeat folding, cover, let rise another 30 min. Meanwhile, adjust oven rack to lower-mid position and heat oven to 450.

Place parchment paper on 2 baking sheets. Transfer dough to floured surface and divide in half. Turn one piece cut side up and dust with flour. Press dough into rough 12×6-inch shape. Fold up the sides to the center to form a 7×4-inch loaf. Place seam-side down on parchment sheet and dust with flour. Repeat with second loaf. Cover loaves with plastic wrap and let sit at room temp. for 30 min.

(Here, CI asks you to transfer loaves to a new rimmed baking sheet, but I just put them straight into the oven). Using fingertips, poke the entire surface of each loaf to form a 10×6-inch rectangle (mine were more like blobs), then spray loaves lightly with water (which I didn’t do). Bake, spraying with water twice more during first 5 min. of baking, until crust is deep brown and center of loaf is 210 degrees (seriously?), 22-27 min. When tapped, the center of the loaf will sound hollow.

Transfer to wire racks to cool to room temperature.

There was a bit too much flour on the bottoms since I didn’t transfer the loaves to a baking stone, but I didn’t care at this point. I had been baking far too long to care.

Best way to eat this bread? Name it!

My friend Krissy is always handy with her appetizers, and this one I blatantly stole from her – ricotta mixed with scallions, basil, S&P; along with chopped tomatoes with more basil, garlic and olive oil. Can you tell we have a lot of basil on hand?

I sliced and lightly toasted my bread, along with a sprinkle of EVOO and a little S&P. Then we spooned on the ricotta and followed with the tomatoes. I love the cold creaminess of the ricotta topped with the fresh, juicy tomatoes. Then the heat of the garlic and floral loveliness of basil.

It is definitely too hot to bake bread this weekend, so we are heading to the mountains, where I will be basking (and baking?) in 70-degree temps.

Enjoy, friends! xoxo

Tomato Pie

I have a new relationship with tomatoes now that I live in The South. I walked into the office lunch room last week and a coworker was making one of Grant’s favorite things: tomato sandwich. Tomato slices, cracked pepper, mayo, bread. A BLT without the B and the L. Okay, I thought…

Then, I went to a dinner with my closest girlfriends. We all made something and the official debutante of the group came with two tomato pies: premade pie crust + garden tomatoes + caramelized vidalia onions + mayo + sharp cheddar cheese. It was SOOOOO good. I took extra home and decided to make my own.

So I turned to my Food Network Magazine and tried their cover recipe: heirloom tomato pie. Homemade cornmeal crust, then manchego and mozzarella cheese with caramelized onions, chives, thyme and parsley; topped with farmers’ market tomatoes and baked until tender.

Just delicious. I beg you to try it – get rid of those tomatoes that are about to go too soft on your window sill. If making for a week-day, just make the crust in advance.

Tomato Pie

Ingredients

  • 1 cup all-purpose flour
  • 3/4 cup yellow cornmeal
  • 3/4 teaspoon fine salt
  • 1 stick cold unsalted butter, cut into 1/2-inch pieces
  • 3/4 cup plus 3 tablespoons shredded manchego cheese
  • 2 tablespoons extra-virgin olive oil
  • 1 large onion, thinly sliced
  • 2 1/4 pounds mixed heirloom tomatoes
  • Kosher salt
  • 3/4 cup shredded mozzarella cheese
  • 1/4 cup mayonnaise
  • 3 tablespoons breadcrumbs
  • 3 tablespoons chopped fresh chives
  • 3 tablespoons chopped fresh parsley
  • 1 teaspoon chopped fresh thyme
  • Freshly ground pepper
  • Fresh basil (for garnish)

Make the crust: Pulse the flour, cornmeal and fine salt in a food processor to combine. Add the butter and 3 tablespoons manchego; pulse until the mixture looks like coarse meal with pea-size bits of butter. Drizzle in 4 tablespoons ice water and pulse until the dough comes together; add 1 more tablespoon ice water if necessary. Turn out onto a sheet of plastic wrap and pat into a disk. Wrap and refrigerate until firm, about 45 minutes (or up to 3 days).

Put the dough between 2 sheets of parchment paper and roll into a 13-inch round (I had to let mine get the chill off first). Transfer the dough to a 9 1/2-inch deep-dish pie plate. Fold the overhang under itself and crimp the edges. Pierce the bottom of the crust all over with a fork. Refrigerate until firm, about 20 minutes. Meanwhile, preheat the oven to 350 degrees F.

Line the crust with foil, then fill with dried beans. Bake until the edges are golden, about 20 minutes. Remove the foil and beans and continue baking until golden all over, 10 to 15 more minutes. Transfer to a rack to cool. Meanwhile, slice the tomatoes and toss with 1 tsp kosher salt in a colander. Let drain, gently tossing occasionally.

Make the filling: Heat 1 tablespoon olive oil in a large skillet over medium heat. Add the onion and cook, stirring, until golden, about 15 minutes. Let cool.

Increase the oven temperature to 375 degrees F.

Combine the remaining 3/4 cup manchego, the mozzarella, mayonnaise, breadcrumbs, 2 tablespoons each chives and parsley, the thyme, 1/4 teaspoon each kosher salt and pepper, and the sauteed onion in a bowl. Spread in the crust.

Arrange the tomatoes on top. Drizzle with the remaining 1 tablespoon olive oil and season with pepper. Bake until the tomatoes are browned, about 50 minutes.


Slice big wedges and serve with fresh basil.

There’s nothing wrong with this. The mixture of cheeses, herbs, onion, sweet crust and juicy tomatoes = the best.

Perfect for your next summer party. Enjoy, friends! xoxo

Chicken Tonkatsu with Watermellon-Herb Salad

It seems like forever since I’ve written here. But a new part of my life now that I’m a Southern gal is the inevitable weekend travel to escape the heat. Everybody, and I mean everybody, heads either for the beach or the mountains every weekend here. They all have beach houses and/or mountain homes and miles of interstates to get them there. Living in Central Oregon, I pretty much stayed put, because there was plenty to do, recreation wise, in town and it was just too exhausting to drive over a mountain pass to get to a real city.

So. Much of my cooking has been done either on the fly, in between neighborhood get-togethers or at high elevations (and the occasional sea-level location).

One such weekender meal was this beautiful panko-crusted chicken cutlet served with a fresh and juicy watermelon-tomato and herb salad. I adapted the recipe from Bon Appetit’s pork tonkatsu. To be honest, it was basically chicken schnitzel, but with Japanese breadcrumbs.

Chicken breast pounded thin and dredged in Dijon-whipped eggs, then Japanese breadcrumbs and lightly fried to develop a crispy crust and juicy meat.

I don’t normally like watermelon, but I love the idea of watermelon in salads that are full of herbal flavors. I added some of our fruity CSA grape tomatoes and fresh basil and parsley to an arugula mix. All you need is a simple vinaigrette to pull this colorful salad together. Amazing!


Chicken Tonkatsu with Watermelon-Herb Salad

Ingredients:

  • 2 cups watermelon cubes
  • 2 cups cherry tomatoes, halved
  • 2 cups (lightly packed) baby arugula or arugula mix
  • 1/4 cup fresh flat-leaf parsley leaves
  • ¼ c. torn basil leaves
  • 1/4 cup extra-virgin olive oil
  • 2 tablespoons Dijon mustard, divided
  • 1 tablespoon fresh lemon juice plus 4 lemon wedges
  • 1/2 teaspoon kosher salt and 1/4 teaspoon freshly ground black pepper plus more
  • 2 large eggs
  • 2 cups panko (Japanese breadcrumbs)
  • 3 boneless, skinless chicken breasts, pounded to 1/8″ thickness
  • 6 tablespoons vegetable oil, divided

Combine first 5 ingredients in a large bowl. Whisk olive oil, 1 tablespoon mustard, and juice in a small bowl. Season dressing with salt and pepper. Set salad and dressing aside.

Whisk eggs and 1 tablespoon mustard in a medium bowl. Combine panko, 1/2 teaspoon salt, and 1/4 teaspoon pepper on a large plate. Season chicken lightly with salt and pepper. Dip in egg mixture, then in panko, pressing to adhere.

Working in 2 batches, heat 2 tablespoons vegetable oil in a large nonstick skillet over medium heat and cook chicken until golden brown and cooked through, about 2 minutes per side, adding 1 tablespoon vegetable oil after turning. Drain on paper towels.

Toss salad with dressing; season to taste with salt and pepper. Serve chicken with salad and lemon wedges for squeezing over.

We enjoyed ours with a nice, crisp glass of white wine and mountain views. It was perfect!

Oh, and our third chicken breast? It became a chicken ‘n a biscuit for the next day’s breakfast. Better than Biscuitville, y’all!

Hope everybody had a beautiful July 4th! xoxo

Gorgonzola Roasted Tomatoes

Tomatoes won’t be big and beautiful for another couple months, but a smart way to get the best flavor out of winter tomatoes is to roast them with bold flavors like Gorgonzola cheese, garlic and herbs.

This recipe is a riff on something in my Giada di Laurentiis cookbook – the Gorgonzola gets thick and bubbly when roasted in the tomatoes, which hold their shape and offer an acidity to the strong flavors.

We had these as a light lunch, but they would be great as a side dish for your next steak dinner.

Gorgonzola Roasted Tomatoes

Ingredients

  • 4 plumb tomatoes, halved, insides scooped out
  • 3 garlic cloves, minced
  • 1/4 c. EVOO
  • Salt and Pepper
  • 1/3 c. bread crumbs
  • 3 oz. Gorgonzola cheese, crumbled
  • Handful Italian parsley, chopped

Preheat oven to 375. Mix olive oil and garlic, seasoning with salt and pepper. Toss in the tomato halves and let marinate 10 min.

Meanwhile, line baking sheet with parchment paper. In a small bowl, mix cheese and bread crumbs.

Place marinated tomato halves on baking sheet, then fill with cheese mixture and drizzle with more olive oil. Roast until tomatoes are just soft and filling is browned, approx. 25 min.

Before serving, sprinkle with parsley.

Grant and I were surprised how much we liked these, given that we aren’t the world’s biggest Gorgonzola/blue cheese fans. But the smoky cheese flavor and the salty/tangy tomato are awesome together, brightened up with the fresh, green herbs.

Enjoy, friends! xoxo

Seared scallops with Christmas risotto

For Christmas Eve dinner, my sister and I prepared a meal perfect for the night before Christmas because it won’t compete with the rib roast and Yorkshire pudding. Scallops seared to a caramel brown sit atop a creamy risotto made with bacon, basil, jalapeno and bright red tomatoes – creating a red and green festive plate.

I’ve made this risotto a couple times before, after seeing it here on We Are Not Martha. However, I’ve had to change a few things. For example, adding the tomatoes at the very-very end to prevent them from dissolving into the risotto. Also, I used more chicken stock than it called for, to add extra creaminess. The only fat you’ll need comes from the smoky bacon, which will blow your family away with the addition of garlic and white wine.

Truly, there’s little to dislike about this dish. The following offers small portions for 4 people, but plenty for 2-3.

Seared scallops with Christmas risotto

Ingredients:

  • 1 pound large sea scallops, rinsed, patted dry, salt and peppered
  • 1 T butter
  • 1 T EVOO
  • 3 slices thick-cut bacon, chopped
  • 3 cloves garlic, minced
  • 1 jalapeno pepper, seeds removed, minced (or 1/2 of large jalapeno) – approx 2 tsp
  • 3/4 c. arborio rice
  • 1/2 c. dry white wine, such as sauvignon blanc
  • 3 c. chicken stock, low-sodium
  • 2-3 tomatoes, seeded and diced (roughly 1 c.)
  • Handful fresh basil, chopped
  • 1/2 c. Parmesano Reggiano, grated, plus more for serving

Heat chicken stock in medium saucepan over medium heat on back burner. Keep simmering.

Meanwhile, add bacon to large saucepan over medium heat. Cook, reducing heat to medium-low, until bacon is crispy. Transfer to paper towels to drain, then pour off all but 1 T of the bacon fat.

Return pan to medium-low heat and add garlic and jalapeno (you could also substitute a pinch of red pepper flakes here). Cook for a minute, until foaming.

Stir in rice and cook until translucent around the edges; 1-2 min.

Add wine, scraping up the bacon bits from the bottom. When wine is absorbed, add 1 ladle (1/2 c.) chicken stock. Stir until absorbed, repeating until all the stock is used or the risotto is creamy with just the smallest bite to it. You don’t want it to be grainy in the middle – but slightly al dente. Check for seasonings (I’ve never had to add extra salt and pepper).

While the rice is cooking, heat a large saute pan over medium heat with butter and EVOO. When butter is melted and foaming, add scallops and sear until a nice brown crust forms on each side. Reserve to a plate.

When risotto is done, stir in the cheese until melted, then add the basil, tomatoes and reserved bacon.

To serve, spoon risotto onto plates, then top with scallops. Serve with extra cheese to dust on top.

I can’t tell you how delicious this is. Served with more white wine and a salad, my family was sighing with happiness. Please try this – special enough for a holiday, but perfect for any ol’ day. Enjoy, friends! xoxo

Tomato Tarte Tatin

I never paid much mind to the whole tomato fruit/vegetable debate.

Like most people, I only eat tomatoes in a savory environment, which makes it seem more like a vegetable. The following recipe proves how tomatoes can blow your mind – becoming a wonderful dessert. Bon Appetit’s tomato tarte tatin reveals tomatoes as a sweet and supple fruit, cooked in bubbling caramel and flavored with vanilla. All atop a puffed pastry.

The magazine description of this recipe says, “This dessert is a revelation. As the tomatoes cook in the caramel, they become sweet and tender but retain their clean, fresh flavor. Prepare to be blown away.” I dare you to resist a testimony like that.

My stomach didn’t want to accept that I would be eating tomatoes cooked with caramel and vanilla. But I am telling you – they tasted like sweet plums! The Bon Appetit description was dead on. Spectacular.

Tomato Tarte Tatin

Ingredients:

  • 1 3/4 lbs. plum (or Roma) tomatoes (8 large)
  • 3 T unsalted butter, at room temperature
  • 3/4 c. sugar
  • 1 tsp vanilla extract
  • 1 sheet frozen puff pastry, thawed, corners cut to make a rough circle
  • Lightly sweetened whipped cream

Preheat oven to 425. Bring large saucepan of water to boil. Cut shallow X in bottom of each tomato and blanch until skins start to peel back, 30 seconds. Remove to ice bath.

Peel tomatoes, half, core and remove seeds.

Spread butter over bottom of 9 1/2-inch cast iron skillet. Sprinkle sugar over, then arrange tomato halves, rounded side down and close together, in the skillet.

Place skillet over medium heat and cook until sugar and butter are reduced to a thick amber syrup, 25 min. Remove skillet from heat and immediately drizzle with vanilla. Top with pastry round, tucking edges in with a knife and pressing close to the tomatoes. Cut 2-3 small slits in the pastry and slide it into the oven. Bake until pastry is deep golden brown, about 24 min. You will smell the vanilla and caramel – it’s wonderful.

Cool tart in skillet 10 min. Cut around sides to loosen pastry and place large plate over the top. Invert with oven mitts, allowing tart to settle on platter. Carefully lift off skillet – many tomatoes may stick, so gently peel them off and place neatly on the tart.

Serve warm or at room temperature with whipped cream.

I honestly can’t believe this recipe works. I doubted it up until I took the first bite, and then we were oohing and ahhing over it. I recommend you serve this to your hard-to-impress guests. Enjoy, friends! xoxo